Perfectly cooking a thin cut of meat can feel like a high-wire act. One moment it’s undercooked, the next, it’s dry and overdone. The margin for error is razor-thin, and achieving that ideal doneness, whether it’s a juicy medium-rare steak or a tender, safely cooked chicken breast, often seems like a culinary gamble. But what if there was a simple, foolproof method to ensure your thin cuts are always cooked to perfection? This comprehensive guide, crafted from over a decade of hands-on experience with meat thermometers, will reveal the secrets to accurately measuring the temperature of thin cuts, transforming your cooking from guesswork into gourmet precision.
Meat Thermometers: Your Essential Tool for Thin Cuts
At its core, a meat thermometer is a device designed to measure the internal temperature of food, providing an accurate reading that helps determine doneness and food safety. For thin cuts, such as flank steak, pork chops, or chicken cutlets, a meat thermometer isn’t just a convenience; it’s an absolute necessity. These cuts cook rapidly, making visual cues or the “touch test” notoriously unreliable. Overcooking is a common pitfall, leading to tough, dry, and flavorless results. Undercooking, on the other hand, poses significant food safety risks.
Using a precise meat thermometer eliminates this uncertainty, allowing you to pull your meat off the heat at precisely the right moment. This ensures not only a safe eating experience but also preserves the juiciness, tenderness, and flavor that can be easily lost in thinner pieces. For thin cuts, specifically, you’ll find certain types of thermometers far more effective than others, primarily due to their design and responsiveness.
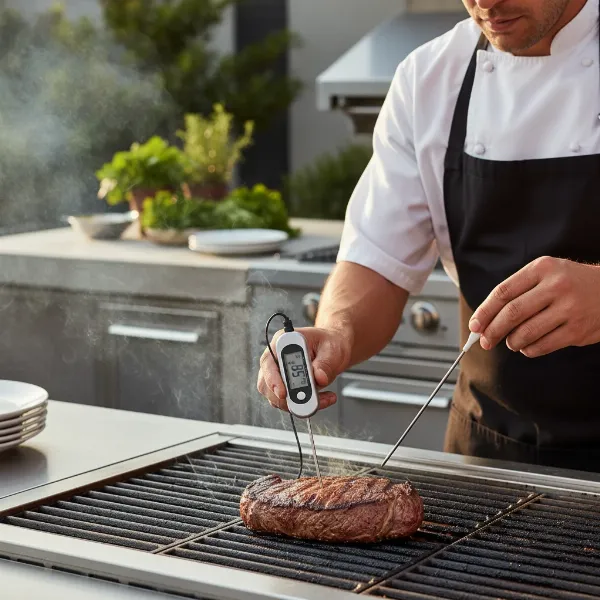 chef using thin probe thermometer to check internal temperature of a cooking flank steak for doneness
Choosing the Right Meat Thermometer for Thin Cuts
Selecting the ideal meat thermometer is paramount when dealing with delicate, thin cuts. Not all thermometers are created equal, and some features are far more beneficial in this context.
Key Factors When Choosing Your Thermometer:
- Probe Diameter: This is arguably the most critical factor for thin cuts. A thin probe (often referred to as a “needle probe”) minimizes the hole made in the meat, preventing excessive juice loss and allowing for more accurate readings in limited space. Look for probes around 1.5mm to 2mm in diameter.
- Speed and Accuracy: For fast-cooking thin cuts, you need a thermometer that provides a reading almost instantly—typically within 1 to 3 seconds. High accuracy (e.g., ±1°F or ±0.5°C) is also crucial to hit those precise doneness targets.
- Display: A large, clear, and often backlit digital display ensures you can read the temperature quickly and easily, even in varying light conditions.
- Durability and Materials: Opt for thermometers with high-quality stainless steel probes that are robust and easy to clean. Water resistance is a valuable feature for kitchen environments.
- Ergonomics and Grip: A comfortable grip and user-friendly design make the thermometer easier to handle, especially when maneuvering it into thin cuts.
- Budget: While you can find thermometers at various price points, investing in a good quality, fast-reading digital thermometer will pay dividends in consistent cooking results.
|
Our Picks for the Best Meat thermometer in 2026
As an Amazon Associate I earn from qualifying purchases.
|
||
| Num | Product | Action |
|---|---|---|
| 1 | Alpha Grillers Meat Thermometer Digital - Instant Read Food Thermometer for Cooking and Grilling Gifts for Men Valentines Day Gifts for Him Her Mom Dad |

|
| 2 | ThermoPro TP03B Digital Meat Thermometer for Cooking, Instant Read Thermometer with Backlight, Kitchen Food Thermometer for Grill Smoker BBQ Oil Deep Fry Candy Bread Coffee with Pop-up Meat Probe |
|
| 3 | 0.5 Sec Instant Read Meat Thermometer Digital with ±0.5℉ Precision, Food Thermometer for Cooking Kitchen Gadgets, Oven Grill Candy BBQ Essentials Accessories, Gifts for Him Dad Men Birthday, Red |
|
| 4 | ThermoPro TP19H Digital Meat Thermometer for Cooking with Ambidextrous Backlit and Motion Sensing Kitchen Cooking Food Thermometer for BBQ Grill Smoker Oil Fry Candy Instant Read Thermometer |
|
| 5 | Professional Meat Thermometer - Instant Read Food Thermometer with Waterproof Design, Backlight, Hold/Min/Max Function - Cooking Thermometer for Grilling, BBQ, Kitchen Use |
|
| 6 | Meat Thermometer Digital, Instant Read Meat ThermometerI for Grill and Cooking, Waterproof Food Thermometer for Kitchen and Outside, BBQ, Turkey, Candy, Liquids, Beef |
|
| 7 | TempPro TP829 1000ft Wireless Meat Thermometer Digital for Grilling and Smoking, 4 Meat Probes Grill Thermometer for Outside Grill, BBQ Thermometer for Cooking Food Temperature (Previously ThermoPro) |
|
| 8 | Ultrean Digital Meat Thermometer for Cooking,Ultra-Fast Instant Read Food Thermometer with Backlight,Foldable Probe,Waterproof Kitchen Thermometer for BBQ,Grill,Fry,Oven,Candy Making |
|
| 9 | Meat Thermometer Digital - Instant Read Food Thermometer for Cooking Grilling, Candy, Air Fryer, Griddle Probe Kitchen Gadgets Essentials BBQ Accessories, Valentines Day Gifts for Him Her, Red |
|
| 10 | Meat Thermometer Digital with 1 Second Instant Read, Large LED Display, Food Thermometer |
|
Comparing Thermometer Types for Thin Cuts:
- Instant-Read Digital Thermometers: These are hands-down the best choice for thin cuts. Their speed, thin probes, and digital precision make them perfect for quickly checking temperatures without disrupting the cooking process significantly. They are designed for quick spot checks.
- Leave-in Probe Thermometers (Oven-Safe): While excellent for larger roasts or prolonged cooking in ovens and grills, these are generally less ideal for very thin cuts. Their probes are often thicker, and the “leave-in” nature isn’t as beneficial when cooking times are so short.
- Analog Dial Thermometers: These are typically slow, less accurate, and have thick probes. They are generally not recommended for any precise temperature measurement, and especially not for thin cuts where speed and precision are critical.
Top Recommended Meat Thermometers for Thin Cuts
Here’s a curated selection of thermometer types that excel with thin cuts, providing the speed and accuracy you need for perfect results.
| Product Type | Key Features for Thin Cuts | Pros | Cons | General Price Range | User Rating (Avg.) |
|---|---|---|---|---|---|
| Ultra-Thin Probe Instant-Read | 1.5mm probe, 1-2 sec reading, high accuracy, rotating display | Minimizes hole, super-fast, excellent precision | Can be a higher investment | $$$ | 4.8/5 |
| Compact Digital Instant-Read | 1.8mm probe, 2-3 sec reading, splash-proof, magnetic back | Portable, reliable, good value, easy storage | Slightly slower than ultra-thin models | $$ | 4.6/5 |
| Professional Grade Instant-Read | 1.6mm probe, <1 sec reading, durable construction, advanced features | Unparalleled speed & accuracy, robust for heavy use | Highest price point | $$$$ | 4.9/5 |
Detailed Review of Recommended Thermometer Features
Let’s delve deeper into what makes these types of thermometers suitable for your culinary adventures with thin cuts.
Ultra-Thin Probe Instant-Read Thermometers
These thermometers represent the pinnacle of design for delicate meats. Their ultra-fine 1.5mm probe leaves an almost imperceptible mark, ensuring minimal juice loss. Readings are typically delivered in a lightning-fast 1-2 seconds with an accuracy of ±0.5°F, which is essential when every degree counts. Many feature an auto-rotating display, making them ambidextrous and easy to read from any angle as you navigate a hot pan or grill. Constructed from food-grade stainless steel, they are designed for both hygiene and longevity. Cleaning is usually a simple wipe-down, often with a waterproof rating that allows for rinsing under a faucet.
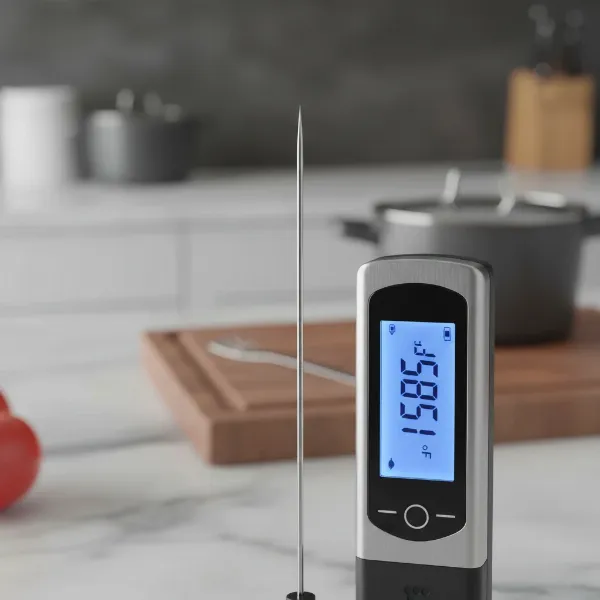 close up of a professional ultra-thin probe instant-read meat thermometer's tip and digital display
Compact Digital Instant-Read Thermometers
A fantastic all-rounder, the compact digital instant-read thermometer offers a slightly thicker but still very capable 1.8mm probe. It delivers accurate readings within 2-3 seconds, a timeframe perfectly acceptable for most thin cuts. These models often boast practical features like splash-proof bodies, magnetic backs for convenient storage on your fridge or grill, and auto-shutoff to conserve battery life. They strike an excellent balance between performance, durability, and affordability, making them a popular choice for home cooks who demand precision without breaking the bank.
Professional Grade Instant-Read Thermometers
For those who seek the absolute best and frequently cook thin cuts, professional-grade models offer unmatched performance. Featuring probes as thin as 1.6mm, they can provide temperature readings in under a second. Their construction often involves more premium materials, designed to withstand the rigors of a professional kitchen, offering superior durability and a longer lifespan. Advanced features might include deeper calibration options, larger temperature ranges, and enhanced ergonomic designs for extended use. While they come with a higher price tag, their speed, accuracy, and robust build quality make them a worthwhile investment for serious cooks.
Mastering the Art: Using and Caring for Your Meat Thermometer with Thin Cuts
Even the best thermometer is only as good as its user. Proper technique is crucial, especially for thin cuts.
Correct Usage for Thin Cuts:
“The biggest mistake I see cooks make with thin cuts is probing from the top,” says the Admin of meatthermometerreviews.com. “For a thin steak or chop, you absolutely need to insert the probe from the side, aiming for the true center. This prevents you from pushing the probe straight through to the pan or grill, which will give you a false, artificially high reading.”
- The Side Insertion Technique: Gently grasp the thin cut with tongs. Insert the thermometer probe horizontally into the thickest part of the meat, avoiding any bones or large pockets of fat, which can skew readings.
- Finding the Thermal Center: Slowly withdraw the probe a millimeter or two at a time. The lowest temperature displayed is generally the true internal temperature, or “thermal center.”
- Multiple Readings: If your cut is irregularly shaped, take a few readings from different spots in the thickest sections to ensure even cooking.
- Timing Your Reading: For the most accurate results, take the temperature while the meat is still on the heat source or immediately after removing it. This gives you the most current temperature before carryover cooking significantly alters it.
Calibration:
Even quality thermometers can drift over time. Periodically calibrate your thermometer using an ice bath (32°F / 0°C) or boiling water (212°F / 100°C at sea level) to ensure its accuracy. Follow your thermometer’s specific instructions for calibration if adjustment is needed.
Cleaning and Storage:
After each use, immediately wipe the probe clean with a damp cloth and mild soap. Many digital thermometers have waterproof probes that can be rinsed under the tap. Ensure the probe is thoroughly dry before storing. Store your thermometer in a protective sheath or a designated drawer to prevent damage to the probe tip.
Common Mistakes to Avoid:
- Probing too shallow or too deep: Both can lead to inaccurate readings. Aim for the very center.
- Touching bone or fat: Bones conduct heat differently, and fat doesn’t reflect the muscle’s doneness.
- Not accounting for carryover cooking: Remove meat a few degrees before your target temperature.
- Checking too frequently: While tempting, constant probing can lead to excessive juice loss.
Elevate Your Cooking: Perfecting Thin Cuts with a Meat Thermometer
A meat thermometer is your secret weapon for consistently perfect results with thin cuts, ensuring food safety and culinary excellence every time.
Achieving Perfect Doneness:
The thermometer empowers you to hit precise internal temperatures, guaranteeing your desired level of doneness. No more guessing, no more dry meat.
Ideal Target Temperatures for Common Thin Cuts:
Remember to remove meat 5-10°F (3-5°C) before the target temperature to account for carryover cooking. Always allow meat to rest.
| Meat Type | Doneness/Goal | Pull Temperature (Off Heat) | Final Resting Temperature |
|---|---|---|---|
| Beef/Lamb Steak | Rare | 120-125°F (49-52°C) | 125-130°F (52-54°C) |
| Medium-Rare | 125-130°F (52-54°C) | 130-135°F (54-57°C) | |
| Medium | 130-135°F (54-57°C) | 135-140°F (57-60°C) | |
| Pork Chops/Tenderloin | Medium | 135-140°F (57-60°C) | 140-145°F (60-63°C) |
| Chicken Breast/Thigh | Cooked Through | 160-165°F (71-74°C) | 165°F (74°C) |
| Fish Fillets | Flaky, Opaque | 135-140°F (57-60°C) | 140-145°F (60-63°C) |
The Importance of Resting:
After cooking, transfer your meat to a cutting board and allow it to rest for 5-10 minutes. This crucial step allows the muscle fibers to relax and reabsorb the juices, ensuring a more tender and flavorful result. During this time, the internal temperature will continue to rise by a few degrees (carryover cooking), which is why you pull the meat off the heat slightly early.
Tips for Perfecting Thin Cuts:
- High Heat, Quick Cook: Thin cuts benefit from searing at high temperatures for a short duration to develop a flavorful crust without overcooking the interior.
- Even Thickness: If possible, choose cuts of uniform thickness or pound them gently to an even thickness for more consistent cooking.
- Room Temperature Start: Allow your thin cuts to come to room temperature for 15-30 minutes before cooking. This promotes more even cooking.
Conclusion
Measuring the temperature of thin cuts of meat doesn’t have to be a daunting task. By understanding the unique challenges and equipping yourself with the right instant-read digital thermometer and proper technique—especially the crucial side-insertion method—you can consistently achieve culinary perfection. Gone are the days of tough, dry meat or uncertain doneness. Embrace the precision a quality meat thermometer offers, and confidently serve up delicious, perfectly cooked thin cuts every time. What thin cut will you perfect first with your new-found precision?
Frequently Asked Questions
Can I use an analog thermometer for thin cuts?
While you technically can, analog thermometers are significantly slower and less accurate than digital models, making them largely unsuitable for the rapid cooking times and precise temperature needs of thin cuts. For best results, always opt for a fast-reading digital thermometer.
How far should I insert the probe into a thin steak?
You should insert the probe into the thickest part of the thin steak, aiming for its absolute center. For thin cuts, this often means inserting the probe horizontally from the side to avoid pushing it through to the cooking surface and ensure you are measuring the core temperature.
What is carryover cooking and how does it apply to thin cuts?
Carryover cooking is the phenomenon where meat continues to cook and its internal temperature rises even after it’s removed from the heat source. For thin cuts, while the temperature rise might be less dramatic than with a large roast, it’s still significant enough that you should remove the meat 5-10 degrees Fahrenheit below your target doneness to prevent overcooking.
Why is my thin steak still tough even if the temperature is right?
Several factors could cause toughness even at the correct temperature. Overcooking by even a few degrees can make thin cuts tough. Insufficient resting time after cooking means the muscle fibers remain tense, and juices haven’t redistributed. Additionally, the quality of the cut itself or improper searing techniques can contribute to toughness.
How often should I check the temperature of thin meat?
For thin cuts, frequent checking is less about safety and more about precision due to their fast cooking. With a reliable instant-read thermometer, you can typically check once or twice as the meat approaches its estimated cooking time. Avoid excessive probing, as each insertion can lead to some juice loss.