Creating caramel from scratch can feel like a culinary tightrope walk. One moment it’s bubbling beautifully, the next it’s a burnt, bitter mess. The secret to consistently achieving that rich, golden perfection lies in precise temperature control, and that’s where your digital meat thermometer becomes an indispensable kitchen tool. Forget guesswork and inconsistent results; with the right technique and your trusty thermometer, you’ll unlock the joy of homemade caramel.
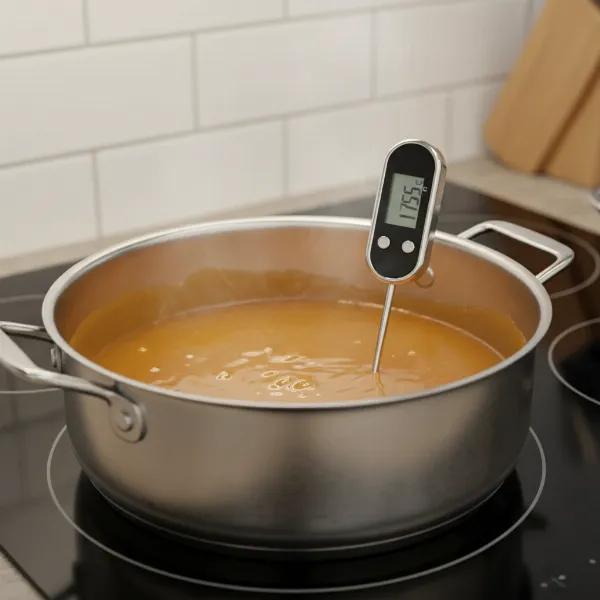 Digital meat thermometer accurately measuring temperature in bubbling golden caramel sauce
Understanding Caramel: The Role of Temperature
Caramel is fundamentally sugar that has been cooked until it caramelizes, transforming its flavor and color. This transformation is a delicate chemical process highly dependent on temperature. As sugar heats up, it goes through various stages, each corresponding to a specific temperature range and resulting in a different texture. A digital thermometer provides the accuracy needed to hit these precise targets, ensuring your caramel is exactly as you intend it.
Using a digital meat thermometer for caramel is a game-changer because it offers instant, accurate readings, often more reliable than older analog candy thermometers which can be prone to calibration issues. This precision is vital, as even a few degrees can dramatically alter the final consistency of your caramel, turning a soft, chewy treat into a brittle shard or a runny sauce.
The various stages of caramel, often described in candy-making, include:
- Soft Ball Stage (235-245°F / 113-118°C): At this temperature, a small amount of caramel dropped into cold water forms a soft, pliable ball. This is ideal for fudges and very soft caramels.
- Firm Ball Stage (245-250°F / 118-121°C): The caramel forms a firmer, but still pliable, ball in cold water. This is the sweet spot for many traditional chewy caramels. Some recipes specifically aim for 248°F or 252°F for a perfect chewy texture.
- Hard Ball Stage (250-265°F / 121-129°C): The caramel forms a hard, but still malleable, ball. This stage is less common for traditional chewy caramels, leaning towards chewier, firmer candies.
- Soft Crack Stage (270-290°F / 132-143°C): Caramel separates into threads that are pliable but not sticky.
- Hard Crack Stage (300-310°F / 149-154°C): The caramel threads are brittle and snap easily. This is the temperature often reached for the initial sugar caramelization before other ingredients are added, and for making hard toffees or brittles.
For delicious, soft caramels, aiming for temperatures between 245°F and 255°F is generally recommended. Exceeding this can lead to a harder, more candy-like texture, while not reaching it will result in a caramel sauce that is too soft or runny.
Choosing the Right Digital Thermometer for Caramel
While dedicated candy thermometers exist, a high-quality digital meat thermometer, especially an instant-read probe, can be perfectly suited for caramel making. When selecting one, consider these key features:
- Accuracy: Precision is paramount. Look for a thermometer with a narrow accuracy range, typically ±1°F or less.
- Speed: Instant-read thermometers are invaluable as caramel temperatures can rise quickly. A rapid response time (2-3 seconds) helps prevent overcooking.
- High-Temperature Range: Ensure your thermometer can safely and accurately read temperatures up to at least 350°F (175°C), as sugar caramelization can reach these highs.
- Probe Design: A thin probe is beneficial for quick readings in smaller batches of liquid without significantly cooling the mixture.
- Clip or Holder: Some digital thermometers come with pot clips, allowing hands-free monitoring. However, remember that many instant-read digital thermometers are not designed to be left in the pot for extended periods. The consistent high heat and steam can damage their internal components.
Before you begin, it’s wise to calibrate your thermometer. A simple way is to place it in boiling water; it should read 212°F (100°C) at sea level. If it’s off by a few degrees, you can either adjust it if your model allows or simply factor that difference into your target temperatures.
Step-by-Step Guide: Making Perfect Caramel with Your Digital Thermometer
Making caramel involves patience and attention to detail. Here’s a detailed guide to achieving perfect results:
Preparing Your Caramel Base
- Ingredients:
- 2 cups granulated sugar
- 1/2 cup water (or corn syrup/glucose for crystal prevention)
- 1 cup heavy cream, warmed
- 1/2 cup unsalted butter, cut into pieces
- 1 teaspoon vanilla extract (optional, added at the end)
- Pinch of salt (optional, for salted caramel)
- Equipment:
- Heavy-bottomed saucepan (3-4 quart)
- Digital meat thermometer (instant-read or probe with clip)
- Pastry brush
- Heat-proof whisk or spoon
|
Our Picks for the Best Meat thermometer in 2026
As an Amazon Associate I earn from qualifying purchases.
|
||
| Num | Product | Action |
|---|---|---|
| 1 | Meat Thermometer Digital, Instant Read Meat ThermometerI for Grill and Cooking, Waterproof Food Thermometer for Kitchen and Outside, BBQ, Turkey, Candy, Liquids, Beef |

|
| 2 | Meat Thermometer Digital - Instant Read Food Thermometer for Cooking Grilling, Candy, Air Fryer, Griddle Probe Kitchen Gadgets Essentials BBQ Accessories, Valentines Day Gifts for Him Her, Red |
|
| 3 | Alpha Grillers Meat Thermometer Digital - Instant Read Food Thermometer for Cooking and Grilling Gifts for Men Valentines Day Gifts for Him Her Mom Dad |
|
| 4 | ThermoPro TP19H Digital Meat Thermometer for Cooking with Ambidextrous Backlit and Motion Sensing Kitchen Cooking Food Thermometer for BBQ Grill Smoker Oil Fry Candy Instant Read Thermometer |
|
| 5 | Meat Thermometer Digital with 1 Second Instant Read, Large LED Display, Food Thermometer |
|
| 6 | Ultrean Digital Meat Thermometer for Cooking,Ultra-Fast Instant Read Food Thermometer with Backlight,Foldable Probe,Waterproof Kitchen Thermometer for BBQ,Grill,Fry,Oven,Candy Making |
|
| 7 | ThermoPro TP03B Digital Meat Thermometer for Cooking, Instant Read Thermometer with Backlight, Kitchen Food Thermometer for Grill Smoker BBQ Oil Deep Fry Candy Bread Coffee with Pop-up Meat Probe |
|
| 8 | 0.5 Sec Instant Read Meat Thermometer Digital with ±0.5℉ Precision, Food Thermometer for Cooking Kitchen Gadgets, Oven Grill Candy BBQ Essentials Accessories, Gifts for Him Dad Men Birthday, Red |
|
| 9 | Professional Meat Thermometer - Instant Read Food Thermometer with Waterproof Design, Backlight, Hold/Min/Max Function - Cooking Thermometer for Grilling, BBQ, Kitchen Use |
|
| 10 | TempPro TP829 1000ft Wireless Meat Thermometer Digital for Grilling and Smoking, 4 Meat Probes Grill Thermometer for Outside Grill, BBQ Thermometer for Cooking Food Temperature (Previously ThermoPro) |
|
- Combine Sugar and Water: In your heavy-bottomed saucepan, combine the sugar and water (or corn syrup/glucose). Stir gently over low to medium heat until all the sugar has completely dissolved. This initial stirring prevents crystallization.
- Prevent Crystallization: Once the sugar is dissolved and the mixture begins to boil, stop stirring. Any sugar crystals on the side of the pan can cause the entire batch to crystallize. Use a wet pastry brush to gently wash down any sugar crystals clinging to the sides of the pan. Adding a squeeze of lemon juice (acid) can also help prevent crystallization.
- Warm Cream and Butter: In a separate small saucepan or microwave, gently warm your heavy cream and butter until the butter is melted and the cream is hot to the touch but not boiling. Keeping these ingredients warm will prevent the mixture from seizing or splattering excessively when added to the hot sugar later.
Monitoring Temperature for Precision
- Attach Your Thermometer: If using a probe thermometer with a clip, attach it to the side of the saucepan, ensuring the tip is immersed in the sugar syrup but not touching the bottom of the pan. If using an instant-read thermometer, keep it handy for quick checks.
- Boil Without Stirring: Increase the heat to medium-high and bring the sugar syrup to a boil. Allow it to cook undisturbed. Watch for the color to change. It will transition from clear to pale yellow, then golden, and finally a rich amber.
- First Temperature Target (Sugar Caramelization): Monitor the temperature. If you’re making a rich, deep caramel, you’ll want the sugar syrup to reach around 300-350°F (149-175°C) before adding the cream and butter. Some recipes suggest around 340°F for a deep amber color. Be extremely vigilant at this stage; caramel can go from perfectly golden to burnt in a matter of seconds. For instant-read thermometers, dip it into the bubbling mixture, stir briefly to get an average reading, and remove it quickly to avoid damage.
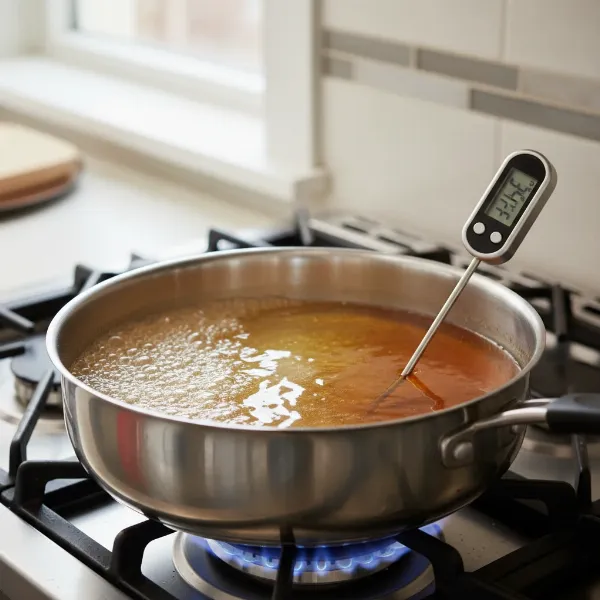 Caramel sugar syrup transforming from clear to golden amber with a digital thermometer
- Add Warm Cream and Butter: As soon as the sugar reaches your desired caramelization temperature and color, immediately remove the pan from the heat. Very slowly and carefully pour in the warmed cream and butter mixture while whisking constantly. The caramel will bubble up furiously and release a lot of steam, so be cautious. Keep whisking until smooth.
Achieving the Perfect Caramel Color and Consistency
- Return to Heat and Second Cook: Place the pan back on medium-low heat. Continue to cook, stirring frequently and continuously, to prevent burning.
- Second Temperature Target (Final Consistency): This is where your digital meat thermometer is crucial for determining the final texture. For soft, chewy caramels, cook the mixture until it reaches between 245°F and 255°F (118-124°C). This is the “firm ball” stage.
- For a slightly softer caramel sauce, aim for 220-230°F (104-110°C) (soft ball stage).
- Remember to dip your instant-read thermometer, stir, read, and remove.
- Finish and Cool: Once the caramel hits your target temperature, remove it immediately from the heat. Stir in the vanilla extract and salt (if using). Pour the hot caramel into a parchment-lined and greased pan to cool completely before cutting.
“The difference a few degrees makes in caramel consistency is astounding. A digital thermometer gives you the confidence to hit that perfect firm ball stage every time.” – Chef Antoine Dubois, Pastry Arts Instructor
Common Caramel Making Pitfalls and How to Avoid Them
Even with a digital thermometer, caramel making can present challenges. Knowing these common issues and how to troubleshoot them will lead to greater success.
Crystallization
This happens when undissolved sugar crystals act as seeds, causing the entire batch to turn grainy.
- Prevention: Ensure all sugar is fully dissolved at the beginning, don’t stir once boiling begins, and use a wet pastry brush to wipe down the sides of the pan. Adding a touch of corn syrup or lemon juice can also help inhibit crystal formation.
Burning the Caramel
Sugar heats rapidly, and the transition from perfectly golden to burnt black is swift.
- Prevention: Use a heavy-bottomed pan for even heat distribution. Never leave the caramel unattended. Have your ingredients (especially the warm cream) ready to add as soon as the target temperature/color is reached, and remove the pan from heat before adding liquid.
Caramel That’s Too Soft or Too Hard
This is almost always a temperature issue.
- Too Soft: The caramel didn’t reach a high enough temperature. It needed to cook longer.
- Too Hard: The caramel cooked too long or to too high a temperature. For future batches, reduce your target temperature by a few degrees. Altitude can also affect boiling points, requiring slight temperature adjustments. If you live at a high altitude, you might need to cook your caramel to a slightly higher temperature to achieve the desired consistency.
Beyond Basic Caramel: Recipes and Ideas
Once you’ve mastered the art of basic caramel with your digital meat thermometer, a world of sweet possibilities opens up.
- Salted Caramel Sauce: A perennial favorite, simply whisk in a good quality sea salt (like fleur de sel) at the very end of the cooking process for a beautiful balance of sweet and savory. Perfect for drizzling over ice cream, brownies, or coffee.
- Caramel Candies: Cut your cooled firm-ball caramel into squares and wrap them individually in wax paper for a classic treat. These are wonderful plain or dipped in chocolate.
- Caramel Apple Dip: A slightly softer caramel (cooked to a lower temperature, around 220-230°F) makes an excellent dip for apple slices or other fruits.
- Caramel for Fillings and Toppings: Use your perfectly cooked caramel to fill tarts, drizzle over cheesecakes, or incorporate into frosting for cakes and cupcakes.
By understanding the science of sugar and harnessing the precision of your digital meat thermometer, you’ll be well on your way to crafting consistently delectable caramel for all your culinary creations. Practice makes perfect, and each batch will bring you closer to caramel mastery.
Frequently Asked Questions
Can I really use a digital meat thermometer instead of a candy thermometer for caramel?
Yes, absolutely! Many professional chefs and home cooks successfully use high-quality instant-read digital meat thermometers for caramel. They offer superior accuracy and speed, which are crucial for precise temperature control in candy making. Just ensure your digital thermometer has a high enough temperature range and remember not to leave it clipped in the pot for extended periods like a traditional candy thermometer, as the intense heat can damage its electronics.
What is the ideal temperature for chewy caramel candies?
For classic soft and chewy caramel candies, aim for a temperature between 245°F and 255°F (118-124°C). This range corresponds to the “firm ball” stage in candy making, where the sugar concentration results in a rich, pliable, and perfectly chewy texture once cooled. Achieving this precise temperature is where your digital meat thermometer truly shines.
My caramel turned grainy. What went wrong?
Grainy caramel, or crystallization, is a common issue often caused by undissolved sugar crystals acting as seeds. To prevent this, ensure all sugar is fully dissolved before the mixture boils, avoid stirring once it’s boiling, and use a wet pastry brush to wipe down any sugar crystals from the sides of the pan. A small amount of corn syrup or lemon juice can also help prevent crystallization.