A reliable digital thermometer is an indispensable tool in any kitchen or medicine cabinet. Whether you’re perfecting a roast to a precise internal temperature or monitoring a family member’s fever, accurate readings are paramount. However, even the most advanced digital thermometer is rendered useless with a dead battery. Fading displays, intermittent readings, or a complete power failure are common signs it’s time for a battery refresh. Don’t let a depleted power source leave you guessing or lead to undercooked meals and inaccurate health data. Replacing the batteries in your digital thermometer is a simple, quick task that can restore your device to full functionality and ensure consistent, accurate results every time.
Why Your Digital Thermometer Needs a Battery Change
A digital thermometer’s precision hinges entirely on its power source. Over time, batteries deplete, leading to a range of performance issues that compromise the device’s reliability. The most obvious signs of a low battery include a dim or flashing display, inconsistent temperature readings, or the thermometer failing to power on at all. For cooking, this can mean the difference between a perfectly cooked steak and an underdone one, while for health monitoring, it can lead to critical inaccuracies when tracking body temperature. Regularly checking for these signs and proactively replacing batteries ensures your thermometer is always ready when you need it most, guaranteeing both safety and optimal results.
Identifying the Right Battery for Your Thermometer
Before attempting any replacement, pinpointing the correct battery type is crucial for your thermometer’s proper function and longevity. The quickest way to identify the necessary battery is to consult your device’s user manual. If the manual isn’t available, carefully examine the battery compartment itself, as many manufacturers print the battery type directly on the casing or the old battery.
Digital thermometers commonly use several battery types:
- Button Cell Batteries: These small, disc-shaped batteries are very popular in compact digital thermometers.
- LR41 and LR44 (1.5V): Frequently found in smaller instant-read thermometers.
- CR2032 (3V): Common in many digital meat thermometers and larger compact models, often found in devices requiring a bit more power.
- L1154F: Another common button cell variant.
- AAA or AA Batteries (1.5V): Larger digital thermometers, particularly those with more features, backlights, or wireless capabilities, often utilize standard AAA or AA batteries.
While most digital thermometers come with alkaline batteries, some may use lithium batteries, especially in compact designs, due to their longer shelf life and stable voltage delivery. Always match the voltage and type precisely to avoid damaging your device. Having the correct battery ensures optimal performance and prevents potential issues after replacement.
 A selection of digital thermometer battery types: button cells (LR41, LR44, CR2032) and AAA/AA batteries.
Step-by-Step Guide to Digital Thermometer Battery Replacement
Replacing the battery in your digital thermometer is a straightforward process, typically requiring only a few minutes. Follow these detailed steps to get your device back in working order:
Preparation is Key
Start by creating a clean, well-lit workspace. This helps prevent losing small parts like screws and ensures you can clearly see the battery compartment and its components.
Gather the necessary tools:
- New Battery: Ensure it’s the correct type and voltage for your specific thermometer model.
- Small Screwdriver: Depending on your thermometer, you might need a Phillips-head or a flathead screwdriver. Some older models might even have a specialized screw.
- Coin or Non-Metal Prying Tool: Useful for opening twist-off or pry-open compartments without causing damage.
- Disposal Container: For safe and responsible disposal of the old battery.
|
Our Picks for the Best Meat thermometer in 2026
As an Amazon Associate I earn from qualifying purchases.
|
||
| Num | Product | Action |
|---|---|---|
| 1 | ThermoPro TP03B Digital Meat Thermometer for Cooking, Instant Read Thermometer with Backlight, Kitchen Food Thermometer for Grill Smoker BBQ Oil Deep Fry Candy Bread Coffee with Pop-up Meat Probe |

|
| 2 | TempPro TP829 1000ft Wireless Meat Thermometer Digital for Grilling and Smoking, 4 Meat Probes Grill Thermometer for Outside Grill, BBQ Thermometer for Cooking Food Temperature (Previously ThermoPro) |
|
| 3 | Ultrean Digital Meat Thermometer for Cooking,Ultra-Fast Instant Read Food Thermometer with Backlight,Foldable Probe,Waterproof Kitchen Thermometer for BBQ,Grill,Fry,Oven,Candy Making |
|
| 4 | Professional Meat Thermometer - Instant Read Food Thermometer with Waterproof Design, Backlight, Hold/Min/Max Function - Cooking Thermometer for Grilling, BBQ, Kitchen Use |
|
| 5 | Meat Thermometer Digital with 1 Second Instant Read, Large LED Display, Food Thermometer |
|
| 6 | Meat Thermometer Digital - Instant Read Food Thermometer for Cooking Grilling, Candy, Air Fryer, Griddle Probe Kitchen Gadgets Essentials BBQ Accessories, Valentines Day Gifts for Him Her, Red |
|
| 7 | Meat Thermometer Digital, Instant Read Meat ThermometerI for Grill and Cooking, Waterproof Food Thermometer for Kitchen and Outside, BBQ, Turkey, Candy, Liquids, Beef |
|
| 8 | ThermoPro TP19H Digital Meat Thermometer for Cooking with Ambidextrous Backlit and Motion Sensing Kitchen Cooking Food Thermometer for BBQ Grill Smoker Oil Fry Candy Instant Read Thermometer |
|
| 9 | 0.5 Sec Instant Read Meat Thermometer Digital with ±0.5℉ Precision, Food Thermometer for Cooking Kitchen Gadgets, Oven Grill Candy BBQ Essentials Accessories, Gifts for Him Dad Men Birthday, Red |
|
| 10 | Alpha Grillers Meat Thermometer Digital - Instant Read Food Thermometer for Cooking and Grilling Gifts for Men Valentines Day Gifts for Him Her Mom Dad |
|
Locate the Battery Compartment
The battery compartment on most digital thermometers is found on the back or bottom of the device. Look for a small panel, a twist-off cap, or a sliding cover. Some models might have a cap at the very end of the thermometer body that needs to be twisted or pulled off.
Open the Compartment
The method for opening varies by model:
- Screwed Covers: If there are tiny screws, use the appropriate screwdriver to carefully remove them. Place the screws in a safe, visible spot to prevent them from getting lost.
- Pry-Open Covers: For covers without screws, you might see a small notch or seam. Gently use a fingernail, a coin, or a small flathead screwdriver to pry open the cover. Apply gentle, even pressure to avoid cracking the plastic.
- Twist-Off/Slide-Off Covers: Some compartments simply twist counter-clockwise or slide off in a specific direction. Look for directional arrows or icons indicating how to open them.
Remove the Old Battery
Once the compartment is open, carefully remove the old battery. Take note of its orientation—specifically, which side (positive or negative) is facing up or towards the compartment door. This is crucial for correctly inserting the new battery. If the battery is snugly fit, you might need to gently pry it out with a non-metal tool like a pen or a small plastic stick to avoid scratching the contacts. In some models, like certain Thermapens, a small metal clip might hold the batteries in place; gently bend this clip away to release them.
Insert the New Battery
Place the new battery into the compartment, ensuring it matches the orientation you observed when removing the old one. Typically, the positive (+) side faces upwards or outwards towards the cover. Ensure the battery sits securely within its slot and makes full contact with the terminals.
Secure the Compartment
Replace the battery compartment cover. If your thermometer has screws, gently tighten them, being careful not to overtighten, as this can strip the threads or damage the device’s seal. For twist-off or slide-on covers, ensure they are firmly closed. A secure seal is especially important for waterproof or water-resistant thermometers to maintain their protective qualities.
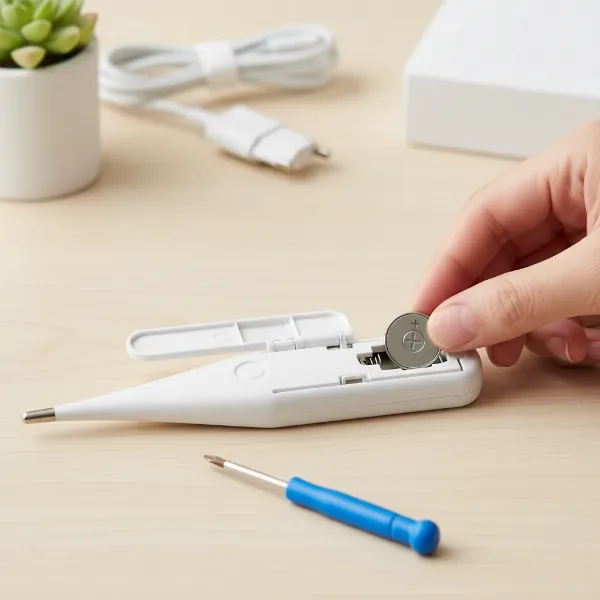 Hands carefully inserting a new button cell battery into a digital thermometer compartment with small screwdriver.
Test Your Thermometer
Finally, turn on your digital thermometer. Check that the display lights up clearly and functions as expected. You might want to perform a quick temperature test, perhaps by checking room temperature or a glass of water, to confirm that it’s providing accurate readings. If it works, congratulations—you’ve successfully replaced your thermometer’s battery!
Troubleshooting Common Battery Replacement Issues
Even with a straightforward process, you might encounter a few hiccups during battery replacement. Here’s how to address common issues:
- Thermometer Still Not Working: If your thermometer remains unresponsive after replacing the battery, first double-check that you’ve inserted the correct battery type and that its positive and negative terminals are oriented correctly. A battery inserted backward is a common culprit. Also, ensure the battery compartment cover is fully closed and securely latched. Sometimes, a faulty new battery can be the issue, so try another fresh battery if available. In rare cases, the device itself might have a malfunction unrelated to the battery.
- Difficulty Opening Compartment: If the compartment is stuck, avoid excessive force. Re-read any instructions (if available) or look for subtle markings. Sometimes, old batteries can swell slightly, making removal difficult. Gentle wiggling with a non-metal tool can help.
- Lost Screws/Parts: Work on a raised surface with a tray or cloth to catch any small components. If a screw is lost, check if a general electronics screw kit has a suitable replacement, or contact the manufacturer.
Maintaining Your Digital Thermometer for Longevity
Proper maintenance extends the life and accuracy of your digital thermometer, beyond just changing batteries.
- Storage: Store your thermometer in a clean, dry place, away from extreme temperatures and humidity. Many come with protective sheaths or cases; use them to guard against physical damage.
- Long-Term Storage: If you plan not to use your thermometer for an extended period (e.g., several months), it’s a good practice to remove the batteries. This prevents potential leakage, which can corrode battery terminals and damage the device.
- Cleaning: After each use, especially with meat or medical thermometers, clean the probe and body according to the manufacturer’s instructions. Most probes can be wiped with an alcohol swab or soapy water, but avoid submerging the entire unit unless it’s specifically designed to be waterproof.
- Handling: Treat your thermometer with care. Avoid dropping it or subjecting it to harsh impacts, as this can affect its calibration and internal components.
A well-maintained digital thermometer, with fresh batteries, will consistently deliver the precise readings you rely on for safe and delicious cooking or accurate health monitoring.
Conclusion
Replacing the batteries in your digital thermometer is a small but impactful act of maintenance that keeps this essential tool reliable and accurate. By following a few simple steps—identifying the right battery, carefully opening the compartment, ensuring correct orientation, and securely closing it—you can quickly revive your device. This not only saves you the cost and inconvenience of purchasing a new thermometer but also ensures you’re always prepared, whether for culinary adventures or health concerns. Don’t let a dead battery compromise your precision; empower yourself with this easy DIY fix. What culinary creation or health milestone will your newly powered thermometer help you achieve next?
Frequently Asked Questions
How often should I change my thermometer battery?
The lifespan of a thermometer battery varies based on usage and battery type. For frequently used thermometers, it’s wise to check the battery status every 6-12 months. If you notice a dim display or inconsistent readings, it’s definitely time for a change.
Can I use any button cell battery?
No, it’s crucial to use the exact battery type specified for your thermometer (e.g., LR41, CR2032, LR44). Different button cells have varying voltages and sizes, and using the wrong one can damage your device or prevent it from working correctly.
What tools do I typically need for battery replacement?
Most digital thermometers require only a small Phillips or flathead screwdriver, or sometimes just a coin or a fingernail to open the battery compartment. A clean, well-lit workspace is also recommended.
How do I dispose of old batteries responsibly?
Old batteries should not be thrown in regular household trash due to environmental concerns. Many communities offer battery recycling programs, or you can drop them off at designated collection points at electronics stores or waste management facilities. Check local regulations for proper disposal.