A reliable meat thermometer is an indispensable tool in any kitchen, ensuring your dishes are cooked to perfection and, more importantly, safely. But the heart of this precision, the probe cable, is often its most vulnerable component. A bent or broken cable can turn your trusted culinary companion into a source of frustration, leading to inaccurate readings or complete failure. This guide will walk you through diagnosing common issues, exploring potential minor fixes, understanding when replacement is necessary, and most importantly, preventing future damage to keep your cooking consistent and delicious.
Understanding Your Meat Thermometer Probe Cable
Meat thermometer probe cables are designed to withstand significant heat, but they are not indestructible. Typically, these cables house delicate internal wires, often thermocouples or thermistors, encased in heat-resistant insulation. This insulation, usually silicone or braided steel, protects the sensitive wiring from the extreme temperatures of ovens, grills, and smokers. Despite their robust exterior, these cables are constantly exposed to thermal stress, physical bending, and potential moisture ingress, making them susceptible to various forms of damage. Common issues include kinking, outright severing of internal wires, short circuits from heat or moisture, and the insulation itself breaking down or melting.
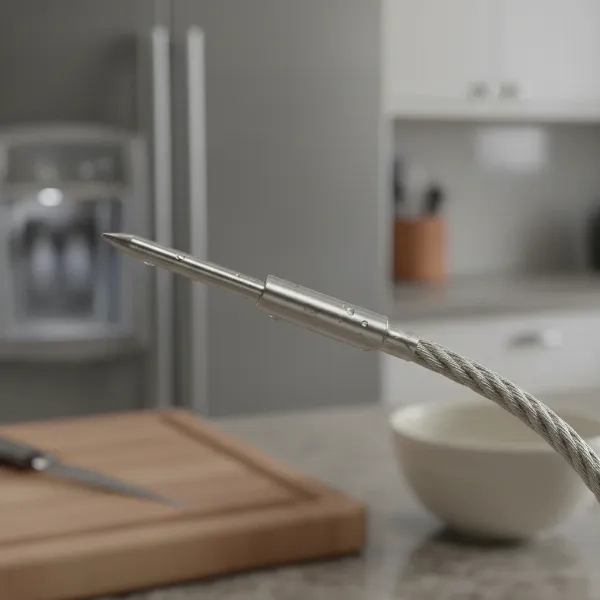 Close-up of a meat thermometer probe and its braided cable, showing common wear points.
Diagnosing a Faulty Probe Cable
Before attempting any repairs or considering a replacement, accurately diagnosing the problem is crucial. A malfunctioning probe cable typically manifests in a few key ways.
Symptoms of a Damaged Cable
- Inaccurate Readings: The most common sign is a temperature reading that seems drastically off, either too high or too low, compared to what you expect.
- Error Codes: Many digital thermometers display error codes like “HHH” (indicating a temperature above the probe’s range or an open circuit) or “LLL” (indicating a temperature below the range or a short circuit) when the probe connection is compromised.
- No Reading: The thermometer might simply display no temperature at all, suggesting a complete break in the circuit.
- Intermittent Readings: The display might flicker or provide inconsistent readings, often pointing to a loose connection or a partial break in the wire.
|
Our Picks for the Best Meat thermometer in 2026
As an Amazon Associate I earn from qualifying purchases.
|
||
| Num | Product | Action |
|---|---|---|
| 1 | TempPro TP829 1000ft Wireless Meat Thermometer Digital for Grilling and Smoking, 4 Meat Probes Grill Thermometer for Outside Grill, BBQ Thermometer for Cooking Food Temperature (Previously ThermoPro) |

|
| 2 | Meat Thermometer Digital, Instant Read Meat ThermometerI for Grill and Cooking, Waterproof Food Thermometer for Kitchen and Outside, BBQ, Turkey, Candy, Liquids, Beef |
|
| 3 | 0.5 Sec Instant Read Meat Thermometer Digital with ±0.5℉ Precision, Food Thermometer for Cooking Kitchen Gadgets, Oven Grill Candy BBQ Essentials Accessories, Gifts for Him Dad Men Birthday, Red |
|
| 4 | Professional Meat Thermometer - Instant Read Food Thermometer with Waterproof Design, Backlight, Hold/Min/Max Function - Cooking Thermometer for Grilling, BBQ, Kitchen Use |
|
| 5 | Meat Thermometer Digital with 1 Second Instant Read, Large LED Display, Food Thermometer |
|
| 6 | ThermoPro TP03B Digital Meat Thermometer for Cooking, Instant Read Thermometer with Backlight, Kitchen Food Thermometer for Grill Smoker BBQ Oil Deep Fry Candy Bread Coffee with Pop-up Meat Probe |
|
| 7 | Ultrean Digital Meat Thermometer for Cooking,Ultra-Fast Instant Read Food Thermometer with Backlight,Foldable Probe,Waterproof Kitchen Thermometer for BBQ,Grill,Fry,Oven,Candy Making |
|
| 8 | ThermoPro TP19H Digital Meat Thermometer for Cooking with Ambidextrous Backlit and Motion Sensing Kitchen Cooking Food Thermometer for BBQ Grill Smoker Oil Fry Candy Instant Read Thermometer |
|
| 9 | Meat Thermometer Digital - Instant Read Food Thermometer for Cooking Grilling, Candy, Air Fryer, Griddle Probe Kitchen Gadgets Essentials BBQ Accessories, Valentines Day Gifts for Him Her, Red |
|
| 10 | Alpha Grillers Meat Thermometer Digital - Instant Read Food Thermometer for Cooking and Grilling Gifts for Men Valentines Day Gifts for Him Her Mom Dad |
|
Initial Checks and the Ice Bath Test
Start with a visual inspection. Check the entire length of the cable for visible signs of damage such as kinks, cuts, cracks in the insulation, or melted spots. Also, ensure the probe’s jack is fully inserted and securely seated in the thermometer unit’s port. Sometimes, a loose connection is the culprit. Clean the port gently with a cotton swab and rubbing alcohol to remove any debris that might hinder proper contact.
To verify the probe’s accuracy, perform an ice bath test:
- Fill a glass with crushed ice and then add water, stirring gently. The goal is a slurry of ice and water, which should theoretically be 32°F (0°C).
- Insert your probe into the center of the ice bath, avoiding touching the sides or bottom of the glass. Stir gently for about a minute.
- A properly functioning probe should read between 32°F (0°C) and 34°F (1°C). If your probe reads significantly outside this range, or displays an error, it confirms a problem with the probe or cable.
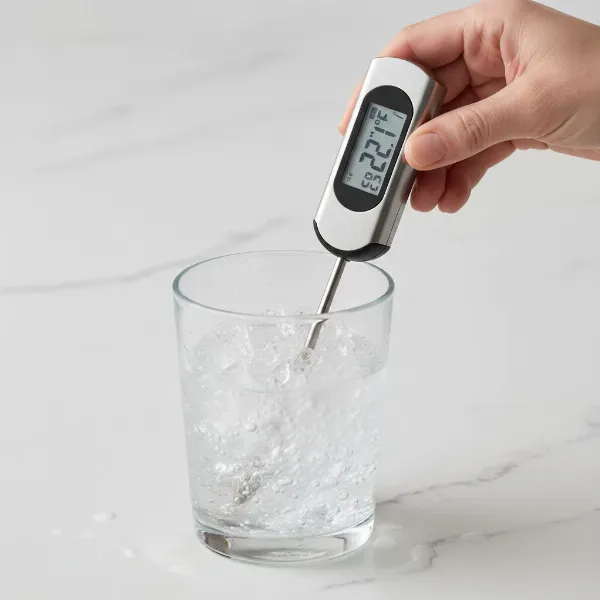 A hand inserting a meat thermometer probe into a glass of ice water for calibration.
DIY Fixes for Minor Probe Cable Issues
For minor issues, some DIY fixes might be possible, though they require careful hands and an understanding of basic electronics. It’s important to acknowledge that the success rate can vary greatly depending on the nature and extent of the damage.
Re-securing Loose Wires (If Accessible)
If the probe cable has simply twisted loose from its connection point inside the thermometer casing (more common in older or simpler models), a repair might be feasible. Carefully unscrew the thermometer casing to expose the internal wiring. If you find wires that have become disconnected, you may be able to strip a small amount of insulation from the ends and carefully twist them back together, then secure with electrical tape. This is generally for low-voltage sensor wires, not main power cables.
Soldering Disconnected Wires (Advanced)
For internal wire breaks or disconnections from a circuit board, soldering might be an option for those with experience. Meat thermometer wires are often very thin and delicate.
- Identify the break: Use a multimeter to pinpoint where the continuity is lost along the cable.
- Access the wires: This might involve carefully stripping back the outer insulation.
- Solder with care: If you can expose the copper wires and they are not too damaged, you can solder them back together. Be mindful of polarity if it’s a thermocouple (though many meat thermometers use thermistors where polarity doesn’t matter for basic function).
- Insulate thoroughly: After soldering, insulate the repair with heat-shrink tubing or high-temperature electrical tape to prevent short circuits and protect from moisture.
Important Note: These DIY fixes are only suitable for specific types of damage and require caution. Attempting to repair complex internal damage, especially with significant heat or moisture exposure, is often not practical or safe for the average user. The wires are tiny, and improper repair can lead to further damage or unsafe operation.
Addressing Bent Cables
If the cable itself is merely bent, but there’s no visible break in the insulation or loss of function, you might gently try to straighten it. However, if the bend is severe enough to have caused internal wire damage, external straightening won’t resolve the issue and could worsen it. Often, a “bent” cable indicates internal wire stress that’s already compromised the connection, making repair unlikely.
When to Replace Your Meat Thermometer Probe (or Unit)
While DIY fixes can be empowering, many types of probe cable damage are either beyond repair or not cost-effective to fix.
Unrepairable Damage
- Internal Short Circuits or Severed Wires: If the problem stems from internal shorting due to moisture or heat, or if the wires are completely severed deep within the insulation, a DIY fix is highly improbable.
- Melted Insulation: Significant melting of the cable’s insulation indicates excessive heat exposure that likely damaged the internal wiring beyond repair.
- Water Ingress: If moisture has entered the probe or cable and corroded the electronics, the sensor’s accuracy will be permanently compromised, making replacement the only reliable option.
Cost-Effectiveness and Compatibility
Many meat thermometer probes are designed as “consumables” due to their exposure to harsh conditions. The cost of a replacement probe (especially for popular brands like ThermoPro or ThermoWorks) is often low enough that attempting a difficult, time-consuming, and potentially unreliable repair isn’t worth it.
When replacing, ensure the new probe is compatible with your existing thermometer unit. Some manufacturers use proprietary connectors or sensor types, so always check the model number and specifications. If you find multiple probes failing or suspect the main unit itself is faulty, replacing the entire thermometer might be a better long-term investment.
Preventing Future Probe Cable Damage
Prevention is always better than cure when it comes to delicate kitchen equipment. Adopting best practices can significantly extend the life of your meat thermometer probe.
Proper Placement
- Avoid Hot Spots: Never let the probe cable come into direct contact with oven heating elements, grill grates, open flames, or the hottest parts of a smoker. These extreme temperatures can quickly melt insulation and damage internal wires.
- Use Designated Openings: Many ovens and smokers have small grommets or openings specifically designed for probe cables. Utilize these to protect the cable from being pinched by oven doors or exposed to direct heat.
- Keep Cables Elevated: Ensure cables are suspended and not draped over hot surfaces, especially inside grills where temperatures can vary widely. Wrapping the cable and transition in aluminum foil can also help reflect excess heat.
Careful Handling
- No Snagging or Twisting: Avoid pulling, twisting, or snagging the cable. Excessive tension can stretch and sever the delicate internal wires.
- Don’t Use as a Lever: Never use the probe cable to jam oven doors open or pull the thermometer unit.
- Proper Storage: When not in use, coil the cable loosely and store the probe in a dedicated, safe place where it won’t be bent sharply or crushed.
Moisture Protection
- Clean Gently: Wipe down probes and cables with a damp cloth and mild soap. Avoid submerging the cable connection or the thermometer unit in water unless explicitly stated as fully waterproof (and even then, check the IP rating for both the probe and the unit).
- Beware of Steam: While cooking, try to keep the cable’s connection points away from direct steam, which can still find its way into seals over time and cause corrosion.
Choosing Durable Probes
When buying a new probe or thermometer, look for models that emphasize durability. Features like reinforced, braided steel cables, heat-resistant springs at the probe-to-cable transition, and high-quality insulation can offer greater longevity.
Maximizing Your Meat Thermometer’s Lifespan
Beyond cable care, a few general practices can ensure your meat thermometer serves you well for years:
- Regular Calibration: Periodically perform the ice bath test to ensure your thermometer remains accurate. Some advanced models even allow for user calibration.
- Understand Temperature Limits: Be aware of the maximum temperature ratings for both the probe tip and the cable. Exceeding these limits is a common cause of damage.
- Battery Maintenance: For digital models, replace batteries regularly or keep them charged to avoid unexpected failures during critical cooking moments.
- Manufacturer Guidelines: Always refer to your thermometer’s user manual for specific care and maintenance instructions, as these can vary by model and brand.
Conclusion
A bent or broken meat thermometer probe cable can be a frustrating setback, but with careful diagnosis, understanding its limitations, and prioritizing prevention, you can often mitigate issues or replace components efficiently. While minor disconnections might be amenable to DIY fixes, extensive internal damage often warrants replacement, which is frequently the most practical and reliable solution. By adopting mindful handling, proper placement, and diligent cleaning practices, you’ll ensure your meat thermometer remains a precise and trusted ally in your culinary adventures, helping you achieve perfect doneness every time.
What measures do you take to protect your meat thermometer probes from wear and tear?
Frequently Asked Questions
Can I use a meat thermometer with a bent probe?
It depends on the severity of the bend. If the bend is minor and there’s no visible damage to the insulation or internal wires, and the thermometer still provides accurate readings (verified with an ice bath test), you might be able to continue using it with caution. However, a significant bend often indicates internal wire damage, which can lead to inaccurate readings or complete failure, making it unsafe for precise cooking.
Are meat thermometer cables interchangeable?
Generally, no. Meat Thermometer cables often have specific connectors and sensor types (e.g., thermistors or thermocouples with varying resistance curves) that are proprietary to a brand or even specific models. Using an incompatible probe can result in incorrect readings or damage to your thermometer unit. Always check your thermometer’s manual or the manufacturer’s website for compatible replacement probes.
How do I test if my meat thermometer probe is broken?
The best way to test if your probe is broken is by performing an ice bath test. Fill a glass with crushed ice and water, stir, then insert your probe. A functional probe should read between 32-34°F (0-1°C). If it reads significantly outside this range, displays an error like “HHH” or “LLL”, or shows no reading, your probe is likely broken. A multimeter can also be used to check for continuity in the cable if you have access to the internal wires.
Why does my meat thermometer read “HHH” or “LLL”?
“HHH” (High High High) or “LLL” (Low Low Low) readings typically indicate a problem with the probe or its connection. “HHH” often suggests an open circuit, meaning the wire is completely broken or disconnected, leading the thermometer to register an impossibly high resistance. “LLL” usually points to a short circuit, where wires are touching incorrectly, causing an impossibly low resistance. Both scenarios mean the thermometer cannot get a proper reading from the sensor, and the probe usually needs to be replaced.