The secret to perfectly cooked, safe meat often lies in one humble kitchen tool: the meat thermometer. For home cooks and culinary enthusiasts alike, this device is indispensable for ensuring food safety and achieving the desired level of doneness, transforming guesswork into precision. However, despite their utility, meat thermometers are often misused, leading to a range of culinary mishaps, from dry, overcooked roasts to potentially unsafe, undercooked poultry. Understanding and avoiding these common pitfalls is crucial for anyone looking to master the art of cooking meat. This comprehensive guide will walk you through the most frequent errors, offering expert advice and practical tips to help you use your meat thermometer with confidence, ensuring every meal is both delicious and safe.
Understanding Your Meat Thermometer: Overview and Benefits
A meat thermometer is a specialized device designed to measure the internal temperature of food, typically meat, poultry, and fish. Its primary purpose is to provide an accurate reading of the core temperature, which is the most reliable indicator of doneness and safety.
Why is using a meat thermometer so crucial? Firstly, it’s about food safety. Many foodborne illnesses are caused by consuming undercooked meat that harbors harmful bacteria. The only way to truly confirm that meat has reached a temperature high enough to kill these pathogens is with a thermometer. Secondly, it ensures precise doneness, preventing the common frustrations of overcooked, dry, or undercooked, unappetizing results. For cuts like steak or lamb, a thermometer allows you to hit specific temperatures for rare, medium-rare, or well-done with remarkable accuracy. This precision helps in achieving perfect texture and juiciness every time.
The market offers several types of meat thermometers, each with distinct advantages. Instant-read digital thermometers provide quick, accurate readings, ideal for checking temperatures in various spots without prolonged exposure to heat. Leave-in probe thermometers, often oven-safe, allow for continuous monitoring, alerting you when the target temperature is reached, perfect for roasts and slow-cooked items. Analog or dial thermometers are simpler, often more affordable, and some are oven-safe, though they tend to be slower and less precise than their digital counterparts. Understanding these types is the first step towards choosing and using the right tool effectively.
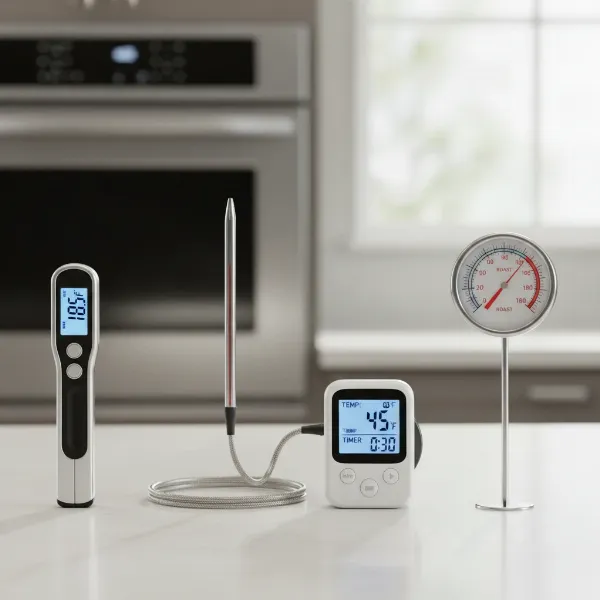 Different types of meat thermometers including instant-read digital, leave-in probe, and analog for various cooking needs.
Essential Guidance: Choosing the Right Meat Thermometer
Selecting the appropriate meat thermometer is paramount to avoiding common usage mistakes and achieving consistent cooking results. Your choice should align with your specific cooking habits and needs.
When considering a purchase, think about the type of meat and dishes you frequently cook. For large roasts, whole poultry, or smoking, a leave-in probe thermometer with a remote monitor or smart features is invaluable as it allows you to track temperature without constantly opening the oven or smoker. For thinner cuts like steaks, burgers, or chicken breasts, an instant-read digital thermometer is superior due to its speed and accuracy, letting you quickly check doneness at multiple points. Your budget will also play a role, with advanced smart thermometers generally being pricier than basic instant-read or analog models.
Crucial features to look for include high accuracy (usually ±1°F or 0.5°C), a fast reading time (2-5 seconds for instant-read), and for probe thermometers, oven-safe cables and high-temperature resistance. Some models offer connectivity (Bluetooth/Wi-Fi) to your smartphone, providing alerts and temperature graphs, which can significantly enhance convenience and prevent overcooking. While all types measure temperature, an instant-read thermometer helps avoid the mistake of pulling meat too early or too late during a quick grill, whereas a leave-in probe helps prevent the error of fluctuating oven temperatures from affecting your long cook. Understanding these distinctions helps you select a tool that minimizes potential errors from the outset.
Common Mistakes to Avoid When Using a Meat Thermometer
Even with the best meat thermometer, improper technique can lead to inaccurate readings and unsatisfactory results. Being aware of these common pitfalls is the key to mastering your cooking.
Incorrect Probe Placement
|
Our Picks for the Best Meat thermometer in 2026
As an Amazon Associate I earn from qualifying purchases.
|
||
| Num | Product | Action |
|---|---|---|
| 1 | Alpha Grillers Meat Thermometer Digital - Instant Read Food Thermometer for Cooking and Grilling Gifts for Men Valentines Day Gifts for Him Her Mom Dad |

|
| 2 | Meat Thermometer Digital with 1 Second Instant Read, Large LED Display, Food Thermometer |
|
| 3 | ThermoPro TP03B Digital Meat Thermometer for Cooking, Instant Read Thermometer with Backlight, Kitchen Food Thermometer for Grill Smoker BBQ Oil Deep Fry Candy Bread Coffee with Pop-up Meat Probe |
|
| 4 | 0.5 Sec Instant Read Meat Thermometer Digital with ±0.5℉ Precision, Food Thermometer for Cooking Kitchen Gadgets, Oven Grill Candy BBQ Essentials Accessories, Gifts for Him Dad Men Birthday, Red |
|
| 5 | Ultrean Digital Meat Thermometer for Cooking,Ultra-Fast Instant Read Food Thermometer with Backlight,Foldable Probe,Waterproof Kitchen Thermometer for BBQ,Grill,Fry,Oven,Candy Making |
|
| 6 | Professional Meat Thermometer - Instant Read Food Thermometer with Waterproof Design, Backlight, Hold/Min/Max Function - Cooking Thermometer for Grilling, BBQ, Kitchen Use |
|
| 7 | Meat Thermometer Digital, Instant Read Meat ThermometerI for Grill and Cooking, Waterproof Food Thermometer for Kitchen and Outside, BBQ, Turkey, Candy, Liquids, Beef |
|
| 8 | ThermoPro TP19H Digital Meat Thermometer for Cooking with Ambidextrous Backlit and Motion Sensing Kitchen Cooking Food Thermometer for BBQ Grill Smoker Oil Fry Candy Instant Read Thermometer |
|
| 9 | TempPro TP829 1000ft Wireless Meat Thermometer Digital for Grilling and Smoking, 4 Meat Probes Grill Thermometer for Outside Grill, BBQ Thermometer for Cooking Food Temperature (Previously ThermoPro) |
|
| 10 | Meat Thermometer Digital - Instant Read Food Thermometer for Cooking Grilling, Candy, Air Fryer, Griddle Probe Kitchen Gadgets Essentials BBQ Accessories, Valentines Day Gifts for Him Her, Red |
|
One of the most frequent mistakes is improperly inserting the thermometer probe. Many cooks mistakenly place the probe into a bone, fat, gristle, or too close to the surface of the meat. Bones conduct heat differently and can give a falsely high reading, while fat and gristle don’t cook to the same internal temperature as muscle, leading to an inaccurate assessment of the meat’s doneness. Shallow insertion or placement near the edge will also give a misleadingly low or high reading, as these areas cook faster.
To avoid this, always insert the probe into the thickest part of the meat, away from any bones, fat pockets, or gristle. For large roasts or whole poultry (like a turkey or chicken), aim for the center of the largest muscle, such as the breast or thigh, ensuring the tip reaches the core. For thinner cuts like steaks or pork chops, insert the probe from the side horizontally into the center. The goal is to measure the coldest part of the meat, which is typically the very center of its thickest section.
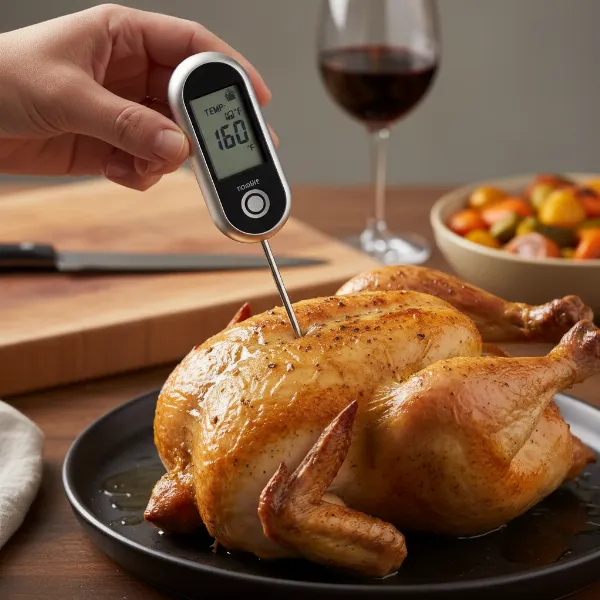 A cook accurately inserting a digital meat thermometer into the thickest part of a roast.
Neglecting Calibration
Many cooks assume their meat thermometer is perpetually accurate, but over time, due to drops, extreme temperature changes, or simply wear and tear, thermometers can lose their calibration. An uncalibrated thermometer will give inaccurate readings, leading you to believe your meat is done when it’s not, or vice versa.
Regular calibration is simple and crucial. The most common method is the ice bath test. Fill a glass with crushed ice and then add water. Stir the mixture and let it sit for a few minutes. Insert your thermometer probe into the ice water, ensuring it doesn’t touch the bottom or sides of the glass. A properly calibrated thermometer should read 32°F (0°C). If it doesn’t, follow your thermometer’s instructions for recalibration (some digital models have a reset button, while some analog models have an adjustment nut). Perform this check regularly, especially if you notice inconsistent cooking results.
Checking Temperature Too Infrequently or Too Late
Waiting until the very end of the cooking process to check the temperature, or only checking once, is a common mistake that can lead to overcooked or unevenly cooked meat. Relying solely on a single, late-stage check provides a snapshot rather than a comprehensive view of the cooking progress.
For larger cuts of meat, it’s advisable to start checking the temperature earlier than you might expect, typically towards the latter half of the estimated cooking time. For roasts or whole birds, check in a few different spots, particularly the thickest areas, to ensure even cooking. This allows you to monitor the meat’s progress and adjust cooking times or temperatures if necessary, preventing you from missing the ideal window of doneness and ensuring consistency throughout.
Ignoring Carryover Cooking
A critical concept often overlooked is carryover cooking, or residual heat. Meat continues to cook even after it’s removed from the heat source. This is because the outer layers are hotter than the interior, and this heat slowly migrates inward, raising the internal temperature by several degrees. Failing to account for this can easily result in overcooked, dry meat.
To avoid this, always remove your meat from the heat source 5-10 degrees Fahrenheit (2-5 degrees Celsius) below your desired final temperature. For example, if you’re aiming for a medium-rare steak at 135°F, pull it off at 130°F. Then, allow the meat to rest for 5-15 minutes, tented loosely with foil. During this resting period, the internal temperature will continue to rise to its target, and the juices will redistribute, resulting in a more tender and flavorful product.
Not Cleaning the Thermometer Properly
Food safety hinges on proper sanitation. When you insert a meat thermometer into raw or partially cooked meat, its probe comes into contact with potential bacteria. Failing to clean and sanitize the probe after each use can lead to cross-contamination, spreading harmful bacteria to other foods or surfaces.
After every use, especially when testing different types of meat or checking raw meat, immediately clean the thermometer probe. Wipe it down thoroughly with a hot, soapy cloth, or use an antibacterial wipe. For most digital instant-read thermometers, only the probe is waterproof, so be careful not to immerse the entire unit. Some professional-grade probes can be rinsed under hot running water or even submerged, but always check your specific model’s instructions. Proper cleaning ensures your thermometer remains a tool for food safety, not a vector for contamination.
Using the Wrong Type of Thermometer for the Task
The variety of meat thermometers available means that each is designed for specific applications. Using an instant-read thermometer as a leave-in probe in the oven, or vice-versa, are common misapplications that can damage the thermometer or lead to inaccurate readings. Most instant-read thermometers are not designed to withstand sustained high oven temperatures and can be damaged if left in. Similarly, a thick leave-in probe might be too slow for quick checks on thin cuts.
Understand the design and limitations of your thermometer. An instant-read digital thermometer is perfect for quick spot checks when grilling or pan-searing. A leave-in probe thermometer with an oven-safe cable is ideal for monitoring large roasts, poultry, or smokers, providing continuous temperature updates. For deep-frying, a thermometer with a clip that attaches to the pot is useful. Matching the thermometer type to the cooking method ensures both accuracy and the longevity of your device.
Relying on Visual Cues Alone
Many traditional cooking methods rely on visual indicators like meat color, juice clarity, or firmness to the touch to determine doneness. While these cues can offer a general idea, they are not reliable indicators of internal temperature or food safety. For example, ground beef can turn brown before it reaches a safe internal temperature, and poultry juices can run clear even if the meat is undercooked.
The United States Department of Agriculture (USDA) and other food safety organizations emphasize that a meat thermometer is the only foolproof way to ensure meat has reached a safe internal temperature. Visual cues can be deceptive and lead to either foodborne illness or an overcooked meal. Always double-check with your thermometer, regardless of how the meat looks or feels.
Not Knowing Target Internal Temperatures
Even with a perfectly calibrated and correctly inserted thermometer, the information is useless if you don’t know the correct target internal temperatures for the specific type and cut of meat you are cooking. Different meats, and different desired doneness levels (e.g., rare vs. well-done beef), require distinct internal temperatures.
Keep a reliable internal temperature chart handy in your kitchen. Here’s a general guideline for safe minimum internal temperatures and common doneness levels (always verify with the latest food safety recommendations, as these can sometimes be updated):
- Poultry (Chicken, Turkey): 165°F (74°C) for all parts.
- Ground Meats (Beef, Pork, Lamb): 160°F (71°C).
- Beef, Pork, Veal, Lamb (Steaks, Chops, Roasts):
- Medium-Rare: 130-135°F (54-57°C)
- Medium: 135-140°F (57-60°C)
- Medium-Well: 140-145°F (60-63°C)
- Well-Done: 145°F (63°C) and above (USDA recommends 145°F for safety, then resting).
- Fresh Pork: 145°F (63°C), then rest for 3 minutes.
- Fish and Shellfish: 145°F (63°C).
Remember to account for carryover cooking when aiming for specific doneness levels.
Immersing Non-Waterproof Thermometers
Cleaning is vital, but so is understanding your thermometer’s design. Many digital thermometers are not fully waterproof; only the metal probe is designed to get wet. Accidentally immersing the entire display unit or battery compartment in water can irrevocably damage the electronics.
Always check the manufacturer’s instructions regarding your thermometer’s waterproof rating. If it’s not explicitly labeled as fully waterproof or dishwasher-safe, assume only the probe can be exposed to water. For cleaning, wipe down the body with a damp cloth, and meticulously clean only the metal probe with hot, soapy water or a sanitizing wipe, being careful to keep the electronic components dry. This simple precaution extends the life of your valuable kitchen tool.
Table Comparison: Understanding Thermometer Types to Avoid Misuse
Choosing the right type of meat thermometer for the job is crucial to preventing common mistakes. Here’s a conceptual comparison of popular thermometer types, highlighting their strengths and how they help mitigate common errors:
| Thermometer Type | Key Features | Ideal Use Cases | How it Helps Avoid Mistakes | Limitations / Potential Misuse |
|---|---|---|---|---|
| Instant-Read Digital | Fast (2-5 sec), highly accurate, large display | Grilling, pan-searing, thin cuts, checking multiple spots | Prevents overcooking due to speed; allows quick verification of multiple points. | Not oven-safe (damage risk), not for continuous monitoring. |
| Leave-in Probe (Oven-Safe) | Continuous monitoring, high-temp cable, alarm | Roasts, whole poultry, smoking, slow cooking | Eliminates constant oven opening (heat loss); alerts prevent missing target temperature. | Slower response time for instant checks; probe must be placed correctly initially. |
| Analog/Dial | Simple, often oven-safe, no batteries | Roasts (when leave-in), basic temperature checks | Generally oven-safe; provides a continuous reading if left in (some models). | Slower, less precise than digital; harder to calibrate; harder to read exact temps. |
| Smart/Wireless Probe | Bluetooth/Wi-Fi connectivity, app monitoring, presets | Grilling, smoking, long cooks, entertaining | Remote monitoring prevents constant checking; alerts ensure meat is pulled at perfect time. | Higher cost, battery dependence; app reliance can be a point of failure. |
Detailed Insights on Thermometer Use
Beyond simply knowing what mistakes to avoid, understanding the deeper aspects of your meat thermometer can significantly enhance your cooking prowess.
The design and material of a meat thermometer, particularly its probe, play a vital role. A thin, sharp probe minimizes juice loss from meat, while medical-grade stainless steel ensures durability and ease of cleaning, directly impacting hygiene and the prevention of cross-contamination. Accuracy and speed are not just features; they are critical in preventing over or undercooking. An instant-read thermometer that gives a reading in 2-3 seconds means you spend less time with the oven door open or hovering over a hot grill, maintaining consistent cooking temperatures and reducing the chance of missing your target.
Special features like audible alarms, preset temperature guides, and app connectivity on smart thermometers are designed to actively prevent common human errors. An alarm prevents you from forgetting the meat or letting it cook past its ideal temperature, especially during busy cooking sessions. Preset temperatures ensure you’re always aiming for the correct safe or desired doneness. These features essentially act as an extra layer of vigilance, reducing stress and increasing confidence in your cooking outcomes. Durability and lifespan are also tied to usage; a well-cared-for thermometer, regularly cleaned and stored, maintains its accuracy and reliability for years, making it a more trustworthy tool over time. Furthermore, a thermometer that is easy to use and clean reduces the likelihood of procedural errors or skipping essential sanitation steps, contributing to overall better cooking practices.
Mastering Your Meat Thermometer: Usage and Maintenance
A meat thermometer is an investment in better cooking. Mastering its use and maintaining it properly ensures you reap maximum benefits.
For correct usage, always have your thermometer ready and calibrated before you start cooking. When placing the probe, visualize the thickest part of your meat, ensuring the tip rests in the very center, away from bone and fat. For large cuts, begin checking temperatures about two-thirds of the way through the estimated cooking time. For smaller items, start checking closer to the end. The “rest” period after cooking is non-negotiable; it allows for carryover cooking and juice redistribution, crucial for tender, moist results.
Care and storage are vital for longevity and accuracy. After each use, clean the probe meticulously with hot, soapy water, or a sanitizing wipe. Be mindful of your thermometer’s waterproof rating; wipe down the main unit if it’s not fully submersible. Store your thermometer in a clean, dry place, protecting the probe from damage (many come with protective sleeves). Recalibrate regularly, or immediately if you suspect a drop or inaccurate reading, to ensure ongoing precision.
Should you encounter common issues, troubleshooting is usually straightforward. If readings seem inaccurate, first check the probe placement and then recalibrate using the ice bath method. If a digital thermometer is slow, check the battery or ensure it’s not being used in conditions it wasn’t designed for (e.g., an instant-read left in a low-temp oven for too long). Understanding these simple steps will help you quickly resolve problems and get back to cooking.
Culinary Perfection: Tips for Better Cooking with Your Meat Thermometer
Elevate your cooking from good to gourmet by fully integrating your meat thermometer into your culinary repertoire. This small tool holds the key to consistently achieving restaurant-quality results in your own kitchen.
Achieving perfect doneness is about hitting that precise internal temperature, accounting for carryover cooking. Whether you’re aiming for a perfectly rare steak, a medium-done pork chop, or a safely cooked chicken, your thermometer is your most reliable guide. It empowers you to pull the meat off the heat at the exact moment, preventing it from drying out or remaining undercooked.
Revisiting the ideal temperatures for various meats is always a good practice. Memorize the critical safe temperatures, especially for poultry and ground meats, as these are non-negotiable for food safety. For other meats, knowing the temperature ranges for different doneness levels allows you to consistently cater to preferences, ensuring satisfaction for every diner.
Your meat thermometer isn’t just for basic safety checks; it’s a versatile tool that can transform specific recipes and techniques. For example, it’s indispensable for reverse-searing steaks, ensuring the internal temperature rises slowly and evenly before a final high-heat sear. When deep-frying, it helps maintain precise oil temperatures for perfectly crispy, non-greasy results. It’s also critical for advanced techniques like sous vide, confirming the meat has reached its target temperature after its water bath. By making your meat thermometer an active partner in your cooking process, you unlock a new level of control and consistency, turning every meal into a triumph.
Conclusion
The meat thermometer, though humble in appearance, is a powerful ally in the kitchen. It is the single most reliable tool for ensuring both food safety and culinary perfection. By understanding and actively avoiding common mistakes such as incorrect probe placement, neglecting calibration, ignoring carryover cooking, or relying solely on visual cues, you transform guesswork into precision. Proper cleaning, maintenance, and selecting the right thermometer for the task further enhance its effectiveness, ensuring its accuracy and longevity.
Embracing these best practices will not only safeguard your health but will also elevate your cooking, allowing you to consistently achieve tender, juicy, and perfectly cooked meats every time. So, arm yourself with knowledge, wield your meat thermometer with confidence, and prepare to impress yourself and your guests with consistently flawless dishes. What culinary masterpiece will you perfect with your thermometer next?
Frequently Asked Questions
How often should I calibrate my meat thermometer?
It’s recommended to calibrate your meat thermometer regularly, ideally once a month if you use it frequently, or whenever you suspect an inaccurate reading. Always recalibrate after the thermometer has been dropped or exposed to extreme temperature changes, such as going from a hot grill to a cold sink.
Can I leave an instant-read thermometer in the oven?
No, most instant-read thermometers are not designed to withstand the sustained high temperatures inside an oven or grill. Leaving them in can damage the internal electronics and affect their accuracy. Instant-read thermometers are meant for quick spot checks, while oven-safe probe thermometers are designed for continuous monitoring during cooking.
What is the best way to clean my meat thermometer?
The best way to clean your meat thermometer is to wash the probe with hot, soapy water immediately after each use. For most digital models, only the probe is waterproof, so be careful not to submerge the main display unit. You can also use an antibacterial wipe or an alcohol swab on the probe for extra sanitization, followed by a rinse.
Why is my meat still tough even if it reached the right temperature?
If your meat reaches the correct internal temperature but remains tough, it’s often due to not allowing it to rest properly after cooking. Resting lets the muscle fibers relax and the juices redistribute, resulting in a more tender texture. Additionally, the cut of meat and cooking method can influence tenderness; some cuts naturally require slower, longer cooking times to become tender.
What’s the difference between a meat thermometer and a candy thermometer?
While both measure temperature, meat thermometers and candy thermometers serve different purposes and have different temperature ranges. Meat thermometers typically measure up to around 220°F (105°C) and are designed for insertion into solids. Candy thermometers are built for much higher temperatures, often up to 400°F (200°C) or more, and are designed for liquids like molten sugar, often with clips to attach to pots. Using a meat thermometer for candy making can damage it.