Imagine slicing into a perfectly grilled steak, expecting a juicy, rosy-pink interior, only to find it dull and overcooked. Or perhaps a succulent roast emerges from the oven seemingly perfect, but by the time it reaches the table, it’s dry and gray. This frustrating scenario is a common pitfall for many home cooks, often caused by a phenomenon known as carryover cooking. Understanding this invisible culinary force is not just for professional chefs; it’s a fundamental principle that can elevate your home cooking, ensuring every piece of meat reaches its peak doneness, juiciness, and flavor. This article will delve into the science behind carryover cooking and provide actionable advice on precisely when to pull your meat, transforming your results from hit-or-miss to consistently perfect.
Understanding Carryover Cooking: The Unseen Culinary Force
Carryover cooking, sometimes called “residual cooking,” is the continued rise in the internal temperature of food after it has been removed from its heat source. This isn’t a myth but a fundamental principle of heat transfer, governed by the laws of physics. When meat is exposed to high temperatures—whether in an oven, on a grill, or in a pan—its outer layers cook much faster and become significantly hotter than its center.
The science behind this is straightforward: heat always seeks equilibrium, flowing from hotter areas to cooler ones. Once you remove the meat from the direct heat, the intensely hot outer layers continue to transfer their stored thermal energy inward, towards the cooler, less-cooked core. This process continues until the temperature throughout the meat equalizes or until the meat cools sufficiently to stop the internal transfer. For larger cuts like roasts, this internal cooking can persist for up to 20 minutes, while smaller cuts like thin steaks will experience a shorter duration. Ignoring carryover cooking almost guarantees overcooked meat, sacrificing tenderness and moisture for a dry, disappointing result.
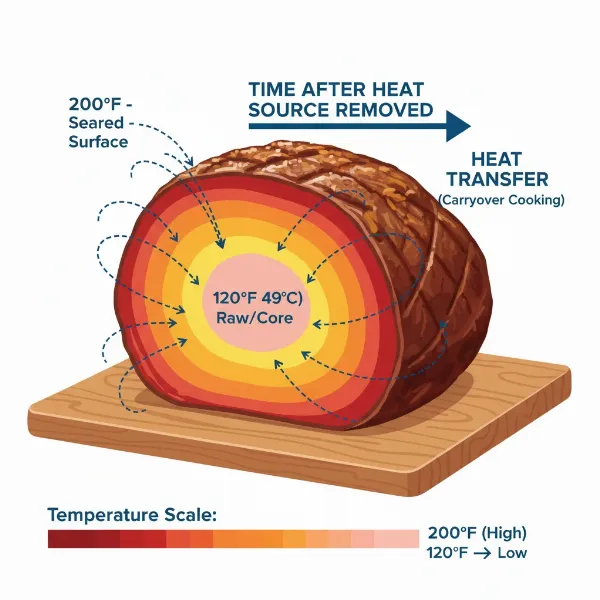 Diagram showing heat transfer in meat during resting, illustrating carryover cooking.
Factors Influencing Carryover Cooking
Several variables dictate the extent of carryover cooking, and understanding them allows for greater precision in the kitchen.
Meat Size and Shape
|
Our Picks for the Best Meat thermometer in 2026
As an Amazon Associate I earn from qualifying purchases.
|
||
| Num | Product | Action |
|---|---|---|
| 1 | TempPro TP829 1000ft Wireless Meat Thermometer Digital for Grilling and Smoking, 4 Meat Probes Grill Thermometer for Outside Grill, BBQ Thermometer for Cooking Food Temperature (Previously ThermoPro) |

|
| 2 | Professional Meat Thermometer - Instant Read Food Thermometer with Waterproof Design, Backlight, Hold/Min/Max Function - Cooking Thermometer for Grilling, BBQ, Kitchen Use |
|
| 3 | Meat Thermometer Digital with 1 Second Instant Read, Large LED Display, Food Thermometer |
|
| 4 | ThermoPro TP03B Digital Meat Thermometer for Cooking, Instant Read Thermometer with Backlight, Kitchen Food Thermometer for Grill Smoker BBQ Oil Deep Fry Candy Bread Coffee with Pop-up Meat Probe |
|
| 5 | ThermoPro TP19H Digital Meat Thermometer for Cooking with Ambidextrous Backlit and Motion Sensing Kitchen Cooking Food Thermometer for BBQ Grill Smoker Oil Fry Candy Instant Read Thermometer |
|
| 6 | 0.5 Sec Instant Read Meat Thermometer Digital with ±0.5℉ Precision, Food Thermometer for Cooking Kitchen Gadgets, Oven Grill Candy BBQ Essentials Accessories, Gifts for Him Dad Men Birthday, Red |
|
| 7 | Ultrean Digital Meat Thermometer for Cooking,Ultra-Fast Instant Read Food Thermometer with Backlight,Foldable Probe,Waterproof Kitchen Thermometer for BBQ,Grill,Fry,Oven,Candy Making |
|
| 8 | Alpha Grillers Meat Thermometer Digital - Instant Read Food Thermometer for Cooking and Grilling Gifts for Men Valentines Day Gifts for Him Her Mom Dad |
|
| 9 | Meat Thermometer Digital - Instant Read Food Thermometer for Cooking Grilling, Candy, Air Fryer, Griddle Probe Kitchen Gadgets Essentials BBQ Accessories, Valentines Day Gifts for Him Her, Red |
|
| 10 | Meat Thermometer Digital, Instant Read Meat ThermometerI for Grill and Cooking, Waterproof Food Thermometer for Kitchen and Outside, BBQ, Turkey, Candy, Liquids, Beef |
|
The most significant factor is the size and thickness of the meat. A large, dense roast or a thick-cut steak will retain more heat and have a greater temperature differential between its exterior and interior than a thin cutlet. Consequently, larger pieces will experience a more pronounced and longer-lasting carryover cooking effect, often seeing a temperature increase of 5-10°F (3-5°C) or more. Thinner cuts, with less mass, will have less heat to transfer and cool down more quickly, resulting in minimal carryover.
Cooking Temperature
The temperature at which you cook your meat also plays a critical role. Meats cooked at very high temperatures (e.g., searing a steak at 500°F or roasting a joint at 400°F) will develop a much hotter crust and a steeper temperature gradient towards the center. This dramatic difference in temperature means more energy is available to transfer inward during resting, leading to greater carryover. Conversely, meat cooked “low and slow” (e.g., smoking brisket at 225°F) will have a more even temperature throughout and thus less carryover cooking.
Meat Composition
The composition of the meat itself contributes to how it handles residual heat. Meat is largely water (around 75%) and fat, both of which are good insulators. This insulating property means that heat collects slowly and transfers slowly through the meat, contributing to the gradual carryover effect rather than an instantaneous cooling.
Resting Environment
While resting meat is crucial, the environment in which it rests can subtly affect carryover. Resting meat uncovered allows some heat to dissipate into the surrounding air from the surface, potentially leading to slightly less carryover than if it were tightly tented with foil. However, tenting is often favored to keep the meat warm and prevent the surface from drying out, while the internal temperatures equalize. The primary goal of resting remains the even distribution of juices and heat, not preventing carryover entirely.
Mastering the Pull Point: When to Remove Meat from Heat
The key to achieving perfect doneness lies in understanding and precisely managing the “pull point”—the exact moment to remove your meat from the heat source before it reaches its final desired internal temperature.
The golden rule is simple: always pull your meat earlier than the final target temperature. This allowance accounts for the inevitable carryover cooking that will occur during resting.
Using a Meat Thermometer
A reliable meat thermometer is your most indispensable tool for this task. Guessing will consistently lead to inconsistent results. An instant-read thermometer allows you to quickly check the internal temperature, while a probe thermometer with an alarm can continuously monitor larger cuts, signaling when they reach the crucial pull temperature. Insert the thermometer into the thickest part of the meat, avoiding any bone, which can give an inaccurately high reading.
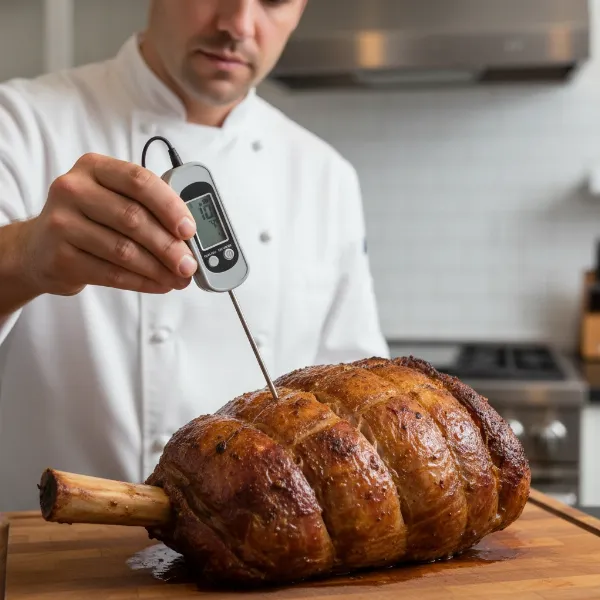 Chef using an instant-read thermometer to check the internal temperature of a roast.
General Guidelines for Temperature Drop
While precise figures can vary based on the factors above, here are general guidelines for how much earlier to pull your meat:
- Thin Steaks (up to 1 inch thick): Pull 2-3°F (1-2°C) below target.
- Thick Steaks (1.5-2 inches thick): Pull 4-5°F (2-3°C) below target.
- Medium Roasts (2-5 lbs): Pull 5-7°F (3-4°C) below target.
- Large Roasts (over 5 lbs) cooked at high heat: Pull 8-12°F (4-7°C) below target.
- Poultry (whole chickens/turkeys): Pull 5-10°F (3-5°C) below target for breast meat, ensuring thighs reach their safe temperature.
For example, if you desire a medium-rare steak at 130°F (54°C), you might pull it off the heat at 125°F (52°C). For a medium-rare roast targeting 130°F (54°C), you might pull it at 120-122°F (49-50°C).
Monitoring During Rest
How do you know when carryover cooking has finished? Keep your meat thermometer in the meat (if it’s a probe thermometer) or check it periodically. The temperature will continue to rise for a period, reach a peak, and then slowly begin to drop as the meat cools. Once the temperature starts to fall, carryover cooking has concluded, and your meat has settled into its final doneness. This moment also signifies that the juices have redistributed optimally.
The Art of Resting: Beyond Carryover Cooking
While carryover cooking occurs during the resting period, resting itself is a distinct and equally vital step in cooking perfect meat. Do not be tempted to skip resting in an attempt to prevent carryover; this will only result in dry, less flavorful meat.
Why Resting is Crucial
Resting allows the muscle fibers, which contract and squeeze out juices during cooking, to relax. As they relax, they reabsorb the juices that have migrated to the center and surface of the meat. This redistribution of moisture results in a significantly juicier, more tender, and flavorful product. Cutting into meat too soon will cause these precious juices to spill out onto the cutting board, leaving you with dry meat.
Carryover Cooking and Resting: A Synergistic Process
The resting period is where carryover cooking does its work. By pulling the meat early, you’re allowing the residual heat to gently bring the interior up to the final desired temperature, while simultaneously allowing the muscle fibers to relax and reabsorb moisture. It’s a dual-action process essential for culinary success.
Proper Resting Techniques
For most cuts, particularly roasts and thick steaks, resting uncovered or loosely tented with foil is recommended. Tenting too tightly can trap steam, which can overcook the exterior and soften the crust you worked hard to achieve. For smaller items or cuts that you want to keep warmer for longer, a loose tent might be preferable. The ideal resting time varies: 5-10 minutes for steaks and chops, and 15-30 minutes (or even longer for very large roasts) for larger cuts. A general rule of thumb is 1 minute of rest per 100g of meat.
Achieving Perfect Doneness: Practical Tips and Temperature Charts
To consistently achieve culinary excellence, integrate these practical tips and a clear understanding of target temperatures into your cooking routine.
Recommended Internal Temperatures (Pulling & Final)
Here’s a quick guide to common internal temperatures for various meats. Remember to pull the meat 5-10°F (3-5°C) before these final targets for carryover.
| Meat Type | Desired Doneness | Pull Temperature (Approx.) | Final Temperature (Rested) | Notes |
|---|---|---|---|---|
| Beef/Lamb | Rare | 115-120°F (46-49°C) | 125-130°F (52-54°C) | Very red center |
| Beef/Lamb | Medium-Rare | 125-130°F (52-54°C) | 135-140°F (57-60°C) | Warm red center |
| Beef/Lamb | Medium | 135-140°F (57-60°C) | 145-150°F (63-66°C) | Pink center |
| Beef/Lamb | Medium-Well | 145-150°F (63-66°C) | 155-160°F (68-71°C) | Slightly pink center |
| Beef/Lamb | Well-Done | 155-160°F (68-71°C) | 165°F+ (74°C+) | No pink, firm texture |
| Pork | Medium | 135-140°F (57-60°C) | 145°F (63°C) | Slight pink, juicy (USDA recommended) |
| Pork | Well-Done | 155-160°F (68-71°C) | 165°F (74°C) | No pink, very firm |
| Poultry | All | 155-160°F (68-71°C) | 165°F (74°C) | Safe minimum (check thickest part) |
| Fish | Flaky | 135-140°F (57-60°C) | 145°F (63°C) | Cook until opaque and flakes easily |
Expert Tips for Precision
- Calibrate Your Thermometer: Ensure accuracy by regularly calibrating your thermometer in ice water (32°F/0°C) and boiling water (212°F/100°C).
- Probe Correctly: Always insert the thermometer into the thickest part of the meat, away from bones or gristle, to get an accurate reading of the coolest section.
- Consider the Crust: A crispy, seared crust can insulate the meat further, potentially increasing carryover. Adjust your pull temperature accordingly.
- Kosher Salt: Many experts recommend using kosher salt for seasoning. Its larger, flaky crystals adhere well to the surface of the meat and dissolve more slowly during cooking and resting, allowing for even seasoning and aiding in the development of a better crust and flavor profile as the carryover cooking process unfolds.
Common Carryover Cooking Mistakes to Avoid
Even with the best intentions, it’s easy to fall prey to common errors that undermine the benefits of understanding carryover cooking.
- Pulling Meat Too Late: This is the most frequent mistake. Waiting until your meat hits the final desired temperature on the heat source guarantees it will be overcooked after resting. Always factor in that crucial temperature rise.
- Skipping the Rest: As tempting as it is to immediately slice into a beautifully cooked piece of meat, skipping the resting period is detrimental. It leads to dry, tough meat as all the precious juices escape onto your cutting board.
- Not Using a Thermometer: Relying solely on visual cues or cooking time charts is a recipe for inconsistency. A reliable meat thermometer is the only way to accurately gauge internal temperature and predict carryover.
- Cutting Too Soon After Resting: Even if you’ve rested for the recommended time, impatient slicing can undo all your efforts. Ensure the meat has truly peaked in temperature and started to slightly cool down before carving.
Conclusion
The science of carryover cooking is not a complex culinary secret, but a fundamental principle of heat transfer that every cook should master. By understanding why meat continues to cook after being removed from the heat and how to account for it, you unlock the ability to consistently achieve perfectly cooked, incredibly juicy, and tender results. Embrace your Meat Thermometer, learn the optimal pull temperatures for different cuts, and always allow for a proper resting period. These simple yet powerful techniques will transform your cooking, ensuring your efforts are rewarded with delicious outcomes every time. So, next time you’re preparing a roast or grilling a steak, remember the science, trust your thermometer, and pull that meat early. What’s your favorite cut of meat to perfect with the magic of carryover cooking?
Frequently Asked Questions
How long does meat rest for carryover cooking?
The duration of resting varies significantly based on the size of the meat. Smaller cuts like steaks might only need 5-10 minutes, while larger roasts or whole poultry could require 15-30 minutes, or even longer. The key is to monitor the internal temperature until it peaks and then begins to drop, indicating that carryover cooking is complete and juices have redistributed.
Does carryover cooking happen in slow cooking?
Yes, carryover cooking still occurs during slow cooking, but typically to a much lesser extent. Because slow cooking involves lower temperatures, the temperature differential between the exterior and interior of the meat is smaller. This results in a minimal increase in internal temperature during resting, perhaps only a few degrees Fahrenheit, compared to high-heat methods.
Can you stop carryover cooking?
You cannot completely stop carryover cooking, as it is a natural physical process of heat equalization. However, you can manage and minimize its effects. Pulling the meat earlier from the heat, resting it uncovered (rather than tightly wrapped), and cooking at lower temperatures will all help control the extent of carryover cooking.
Is it okay to cover meat while it rests?
It is generally okay to cover meat loosely with foil while it rests. This helps to retain warmth, especially for larger cuts. However, avoid wrapping it tightly, as this can trap too much steam, which might soften a crispy crust and potentially cause the meat to continue cooking more than desired. Resting uncovered or with a very loose tent is often preferred.
Why do chefs recommend pulling meat early?
Chefs recommend pulling meat early to account for carryover cooking. They understand that the internal temperature will continue to rise after the meat is removed from the heat source. By pulling it a few degrees below the target doneness, they ensure that the meat reaches its perfect final temperature during the resting phase, preventing it from becoming overcooked and dry.