Have you ever dreamt of creating glossy, snappy chocolates at home, only to be met with dull, streaky, or soft results? The secret to professional-quality chocolate lies in a precise technique called tempering, and its most crucial tool is a reliable thermometer. Without accurate temperature control, the delicate cocoa butter crystals in chocolate won’t align correctly, leading to undesirable textures and appearances. This guide will demystify the art of chocolate tempering, focusing on how to master it with the indispensable aid of a thermometer, ensuring your homemade treats are always perfect.
Understanding Chocolate Tempering and Why a Thermometer is Essential
Chocolate tempering is a critical process of heating and cooling chocolate to specific temperatures to stabilize the cocoa butter crystals. Untempered chocolate, when melted and cooled, results in a chaotic mix of crystal formations, leading to a dull finish, crumbly texture, and susceptibility to “bloom” (white, dusty streaks). When chocolate is properly tempered, the cocoa butter forms stable beta crystals, giving it a beautiful sheen, a satisfying snap when broken, and improved resistance to melting and bloom. This stabilization extends shelf life and ensures a smooth, consistent texture.
The role of a thermometer in this process is paramount. Chocolate tempering is a delicate dance of temperature, and even a few degrees off can lead to failure. A thermometer allows you to accurately track the chocolate’s journey through its melting, cooling, and rewarming phases, ensuring that you hit the narrow temperature windows required for stable crystal formation. Without a thermometer, achieving truly tempered chocolate is largely guesswork.
Choosing the Right Thermometer for Chocolate Tempering
Selecting the appropriate thermometer is the first step towards successful chocolate tempering. Not all thermometers are created equal, and specific features make some more suitable than others for this precise task.
Factors to Consider When Choosing:
- Accuracy: This is non-negotiable. Look for thermometers with an accuracy of at least ±1°F (±0.5°C) to ensure you’re hitting the precise temperature points.
- Speed: Instant-read thermometers are highly recommended as they provide quick, continuous temperature updates, which is crucial when working with rapidly cooling or heating chocolate. Response times of 4-5 seconds are ideal.
- Temperature Range: The thermometer should comfortably measure temperatures within the range required for chocolate tempering, typically between 80°F (27°C) and 130°F (55°C).
- Probe Length: Ensure the probe is long enough to reach into your chocolate without touching the bottom of the bowl, which can give an inaccurate reading.
- Digital vs. Analog: Digital thermometers generally offer greater precision and easier readability compared to their analog counterparts.
- Special Features: A hold function can be useful, and an auto-shutoff helps preserve battery life.
Comparison of Thermometer Types:
- Digital Instant-Read Thermometers: These are often considered the best choice for chocolate tempering due to their high accuracy, rapid response time, and clear digital display. Many can also be used for other cooking tasks, including measuring meat temperatures.
- Candy/Sugar Thermometers: Designed for high-temperature applications like candy making, these usually have a long probe and a pan clip. While suitable, they can sometimes be slower to react and have less precise increments than dedicated instant-read digital models.
- Infrared (IR) Contactless Thermometers: These “gun-shaped” thermometers measure surface temperature quickly. While convenient for spot checks on a wide surface (like during the tabling method), they may not accurately reflect the internal temperature of a larger volume of chocolate being stirred, making them less ideal as a primary tempering thermometer.
- Avoid: Basic dial meat thermometers or oven thermometers that lack the necessary precision or temperature range for chocolate work. While some advanced digital meat thermometers can be used if they meet the accuracy and response time criteria, a dedicated instant-read or candy thermometer is generally preferred.
“Precision in temperature is the single most important factor for achieving perfect chocolate temper. A good thermometer isn’t just a tool; it’s your guide to confectionery success.” – Chef Antoine Dubois, Master Chocolatier
 A close-up of a digital instant-read thermometer accurately measuring chocolate temperature in a bowl.
Step-by-Step Guide: Tempering Chocolate with a Thermometer
The seeding method is a popular and effective technique for tempering chocolate at home, relying heavily on accurate temperature control.
Preparation is Key:
- High-Quality Chocolate: Start with good quality chocolate (couverture is ideal) in chopped pieces or callets.
- Clean, Dry Tools: Ensure all bowls, spatulas, and your thermometer are absolutely spotless and bone dry. Even a single drop of water can cause chocolate to seize and become unusable.
- Work Environment: A cool, dry room (around 68-72°F or 20-22°C) is best.
Method (Seeding Method):
Step 1: Melt the Chocolate
Using a double boiler or microwave on low power, gently melt about two-thirds of your chopped chocolate. Stir constantly to ensure even melting.
- Temperature Target: For dark chocolate, heat to 115-120°F (46-49°C). For milk or white chocolate, heat to 105-115°F (40-46°C).
- Thermometer Use: Keep the thermometer immersed in the chocolate, stirring it around to get an accurate reading. Do not let the probe touch the bottom of the bowl.
|
Our Picks for the Best Meat thermometer in 2026
As an Amazon Associate I earn from qualifying purchases.
|
||
| Num | Product | Action |
|---|---|---|
| 1 | ThermoPro TP19H Digital Meat Thermometer for Cooking with Ambidextrous Backlit and Motion Sensing Kitchen Cooking Food Thermometer for BBQ Grill Smoker Oil Fry Candy Instant Read Thermometer |

|
| 2 | Ultrean Digital Meat Thermometer for Cooking,Ultra-Fast Instant Read Food Thermometer with Backlight,Foldable Probe,Waterproof Kitchen Thermometer for BBQ,Grill,Fry,Oven,Candy Making |
|
| 3 | Alpha Grillers Meat Thermometer Digital - Instant Read Food Thermometer for Cooking and Grilling Gifts for Men Valentines Day Gifts for Him Her Mom Dad |
|
| 4 | Meat Thermometer Digital with 1 Second Instant Read, Large LED Display, Food Thermometer |
|
| 5 | ThermoPro TP03B Digital Meat Thermometer for Cooking, Instant Read Thermometer with Backlight, Kitchen Food Thermometer for Grill Smoker BBQ Oil Deep Fry Candy Bread Coffee with Pop-up Meat Probe |
|
| 6 | 0.5 Sec Instant Read Meat Thermometer Digital with ±0.5℉ Precision, Food Thermometer for Cooking Kitchen Gadgets, Oven Grill Candy BBQ Essentials Accessories, Gifts for Him Dad Men Birthday, Red |
|
| 7 | Meat Thermometer Digital - Instant Read Food Thermometer for Cooking Grilling, Candy, Air Fryer, Griddle Probe Kitchen Gadgets Essentials BBQ Accessories, Valentines Day Gifts for Him Her, Red |
|
| 8 | TempPro TP829 1000ft Wireless Meat Thermometer Digital for Grilling and Smoking, 4 Meat Probes Grill Thermometer for Outside Grill, BBQ Thermometer for Cooking Food Temperature (Previously ThermoPro) |
|
| 9 | Professional Meat Thermometer - Instant Read Food Thermometer with Waterproof Design, Backlight, Hold/Min/Max Function - Cooking Thermometer for Grilling, BBQ, Kitchen Use |
|
| 10 | Meat Thermometer Digital, Instant Read Meat ThermometerI for Grill and Cooking, Waterproof Food Thermometer for Kitchen and Outside, BBQ, Turkey, Candy, Liquids, Beef |
|
Step 2: Cool and Agitate (Seeding)
Once the chocolate reaches its initial melting temperature, remove it from the heat source. Add the remaining one-third of your un-melted, finely chopped chocolate (your “seed” chocolate) to the melted chocolate.
- Stir Vigorously: Stir constantly and vigorously. The seed chocolate will help cool down the melted chocolate and introduce stable cocoa butter crystals.
- Monitor Temperature Closely: Continue stirring and monitoring the temperature with your thermometer. The goal is to bring the chocolate down to its working temperature. This can take time, sometimes 10-15 minutes.
- Temperature Target:
- Dark Chocolate: Cool to 88-91°F (31-33°C).
- Milk Chocolate: Cool to 86-88°F (30-31°C).
- White Chocolate: Cool to 84-86°F (29-30°C).
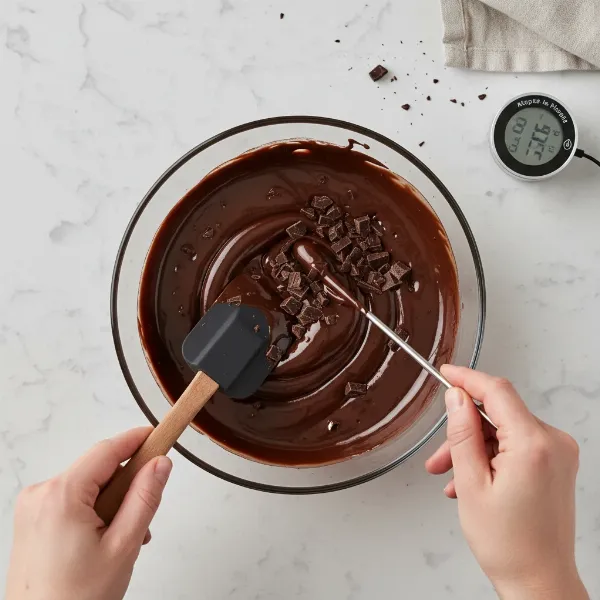 Hands stirring melted chocolate with seed chocolate while a digital thermometer monitors temperature.
Step 3: Reheat Slightly (If Necessary)
If your chocolate cools below the working temperature, you may need to gently rewarm it. Place the bowl back over the warm (but not boiling) water bath for a few seconds, or microwave it in 5-second bursts, stirring continuously.
- Critical Point: Do not exceed the working temperature range. Overheating will destroy the stable crystals you’ve worked to create, and you’ll have to start the tempering process over.
Step 4: Test for Temper
Once your chocolate is within the desired working temperature range, perform a temper test.
- Method: Dip the tip of a spoon, a knife, or a piece of parchment paper into the chocolate.
- Observation: Properly tempered chocolate should set quickly (within 3-5 minutes) at room temperature, forming an even, shiny, streak-free coating that has a clean snap. If it takes longer to set, or appears dull or streaky, the chocolate is not properly tempered.
Table of Ideal Tempering Temperatures:
| Chocolate Type | Initial Melt Temp (F°/C°) | Cooling/Working Temp (F°/C°) |
|---|---|---|
| Dark Chocolate | 115-120°F / 46-49°C | 88-91°F / 31-33°C |
| Milk Chocolate | 105-115°F / 40-46°C | 86-88°F / 30-31°C |
| White Chocolate | 105-115°F / 40-46°C | 84-86°F / 29-30°C |
Note: Some sources may have slight variations in temperature ranges. The key is consistency and careful monitoring.
Troubleshooting Common Tempering Problems
Even with a thermometer, tempering can present challenges. Here’s how to address common issues:
- Problem: Chocolate is dull, streaky, or has white “bloom.”
- Cause: Improper tempering; the cocoa butter crystals did not form correctly or melted during storage.
- Solution: Re-temper the chocolate from scratch, paying extra attention to hitting the precise temperature points. Ensure your environment is cool and dry.
- Problem: Chocolate won’t set or is soft.
- Cause: Chocolate was either too hot or too cold during the working phase, or not stirred enough to promote crystal formation.
- Solution: Verify your thermometer’s accuracy. If it’s too cool, gently warm it back to working temperature. If too hot, you’ll need to re-temper.
- Problem: Chocolate is too thick or sludgy.
- Cause: Most commonly, water contamination (even a tiny drop can cause seizing) or overheating the chocolate beyond its initial melt temperature.
- Solution: If contaminated with water, the chocolate is usually irreversible. If merely overheated, try adding more seed chocolate and re-tempering, though the texture might be compromised.
- The Thermometer’s Role in Diagnosis: Your thermometer is your first line of defense. Consistent and accurate temperature readings are essential for identifying where the tempering process went wrong. If your chocolate isn’t behaving as expected, re-check the temperature before assuming other issues.
Tips for Perfect Chocolate Tempering Every Time
Beyond the thermometer, a few practices will elevate your tempering success:
- Use High-Quality Chocolate: Chocolate with a higher cocoa butter content (couverture) is easier to temper and yields better results.
- Ensure All Equipment is Bone Dry: Water is chocolate’s enemy; it will cause it to seize instantly.
- Stir Constantly and Evenly: Continuous stirring helps distribute heat and cool the chocolate uniformly, encouraging stable crystal formation.
- Monitor Temperature Continuously: Don’t just check the temperature once. Keep your thermometer in the chocolate and watch it closely, especially during the cooling phase.
- Work in a Cool, Dry Environment: High humidity and warmth can negatively impact tempering and setting.
- Don’t Rush the Process: Tempering requires patience. Rushing can lead to inaccurate temperatures and unstable chocolate.
- Practice Makes Perfect: Chocolate tempering is a skill. Don’t be discouraged by initial failures; each attempt is a learning experience.
Conclusion
Mastering the art of chocolate tempering transforms your homemade confections from good to gourmet. The seemingly complex process becomes manageable and rewarding with the right tools and techniques. As we’ve explored, an accurate thermometer is not just a helpful accessory; it is the cornerstone of successful tempering, allowing you to navigate the critical temperature thresholds with confidence. By understanding the science, choosing the right thermometer, and diligently following the steps, you unlock the secret to shiny, snappy, and perfectly stable chocolate creations. So, equip yourself with a precise thermometer, embrace the process, and prepare to impress with your flawlessly tempered treats. What exquisite chocolate creations will you temper next?
Frequently Asked Questions
What is the best type of thermometer for tempering chocolate?
The best type of thermometer for tempering chocolate is typically a digital instant-read thermometer due to its high accuracy (within ±1°F or 0.5°C) and quick response time (4-5 seconds). These features allow for precise and continuous temperature monitoring, which is crucial for successful tempering.
Can I temper chocolate without a thermometer?
While some experienced chocolatiers might attempt it using sensory cues, tempering chocolate without a thermometer is extremely challenging and often leads to inconsistent results. The precise temperature control required for stable cocoa butter crystal formation makes a thermometer an indispensable tool for reliable tempering.
What if my chocolate gets too hot during tempering?
If your chocolate exceeds its target working temperature during the cooling or rewarming phases, you risk destroying the stable cocoa butter crystals you’ve worked to create. You will likely need to re-melt the chocolate to its initial higher temperature and then re-temper it from the beginning.
How do I know if my chocolate is properly tempered?
You can test for temper by dipping a knife or piece of parchment paper into the chocolate. If it is properly tempered, the chocolate will set quickly (within 3-5 minutes) at room temperature, appearing shiny, smooth, and breaking with a distinct snap. Dullness or streaking indicates improper temper.
What is “bloom” in chocolate?
Chocolate bloom refers to the unsightly white or grayish streaks or spots that can appear on the surface of chocolate. This is caused by unstable cocoa butter crystals separating and rising to the surface (fat bloom) or sugar crystals migrating to the surface (sugar bloom), often due to improper tempering or fluctuating storage temperatures.