Have you ever wondered if your trusty analog meat thermometer is truly giving you accurate readings? In the kitchen, precision is paramount, not just for achieving that perfect medium-rare steak but, more importantly, for ensuring the safety of the food you prepare. An improperly calibrated thermometer can lead to undercooked meals, posing health risks, or overcooked dishes that disappoint your palate. This guide will walk you through the simple, yet crucial, steps to check and adjust your analog thermometer, transforming your cooking experience with reliable temperature measurements.
The Critical Importance of a Calibrated Analog Thermometer
Calibration refers to the process of setting a thermometer to a known, accurate temperature. For food thermometers, this means ensuring they correctly read standard freezing or boiling points. Why is this so vital? Primarily, it’s about food safety. Pathogens like bacteria thrive in what’s known as the “temperature danger zone” (TDZ), typically between 41°F and 135°F (5°C and 57°C). If your thermometer is inaccurate, you might mistakenly believe food has reached a safe internal temperature, when in reality, it hasn’t, potentially leading to foodborne illness. Beyond safety, accurate readings are key to culinary success, ensuring meats are cooked to your desired level of doneness every time, from a juicy roast to a tender poultry dish.
Knowing when to calibrate your analog thermometer is as important as knowing how. It’s recommended to calibrate new thermometers straight out of the box, after they’ve been dropped, or if they’ve experienced an extreme temperature change, such as going from very cold to very hot. For optimal food safety and consistent cooking results, bimetallic (dial) thermometers should ideally be checked before every shift in a professional kitchen or regularly in a home setting. All calibrated thermometers should aim for an accuracy within plus or minus 2°F (1°C).
Essential Methods for Checking Analog Thermometer Calibration
There are two primary, reliable methods for checking the calibration of your analog thermometer, both relying on the known phase-change temperatures of water: the ice point method and the boiling point method. The ice point method is generally considered safer and more common for routine checks.
The Ice Point Method
|
Our Picks for the Best Meat thermometer in 2026
As an Amazon Associate I earn from qualifying purchases.
|
||
| Num | Product | Action |
|---|---|---|
| 1 | Alpha Grillers Meat Thermometer Digital - Instant Read Food Thermometer for Cooking and Grilling Gifts for Men Valentines Day Gifts for Him Her Mom Dad |

|
| 2 | Meat Thermometer Digital with 1 Second Instant Read, Large LED Display, Food Thermometer |
|
| 3 | ThermoPro TP03B Digital Meat Thermometer for Cooking, Instant Read Thermometer with Backlight, Kitchen Food Thermometer for Grill Smoker BBQ Oil Deep Fry Candy Bread Coffee with Pop-up Meat Probe |
|
| 4 | ThermoPro TP19H Digital Meat Thermometer for Cooking with Ambidextrous Backlit and Motion Sensing Kitchen Cooking Food Thermometer for BBQ Grill Smoker Oil Fry Candy Instant Read Thermometer |
|
| 5 | Meat Thermometer Digital, Instant Read Meat ThermometerI for Grill and Cooking, Waterproof Food Thermometer for Kitchen and Outside, BBQ, Turkey, Candy, Liquids, Beef |
|
| 6 | Meat Thermometer Digital - Instant Read Food Thermometer for Cooking Grilling, Candy, Air Fryer, Griddle Probe Kitchen Gadgets Essentials BBQ Accessories, Valentines Day Gifts for Him Her, Red |
|
| 7 | Ultrean Digital Meat Thermometer for Cooking,Ultra-Fast Instant Read Food Thermometer with Backlight,Foldable Probe,Waterproof Kitchen Thermometer for BBQ,Grill,Fry,Oven,Candy Making |
|
| 8 | TempPro TP829 1000ft Wireless Meat Thermometer Digital for Grilling and Smoking, 4 Meat Probes Grill Thermometer for Outside Grill, BBQ Thermometer for Cooking Food Temperature (Previously ThermoPro) |
|
| 9 | 0.5 Sec Instant Read Meat Thermometer Digital with ±0.5℉ Precision, Food Thermometer for Cooking Kitchen Gadgets, Oven Grill Candy BBQ Essentials Accessories, Gifts for Him Dad Men Birthday, Red |
|
| 10 | Professional Meat Thermometer - Instant Read Food Thermometer with Waterproof Design, Backlight, Hold/Min/Max Function - Cooking Thermometer for Grilling, BBQ, Kitchen Use |
|
The ice point method uses the precise freezing point of water as a benchmark.
Here’s how to do it:
- Prepare the Ice Bath: Fill a tall glass or deep container with crushed ice. Add clean tap water until the container is full, creating a 50/50 mixture of ice and water. Stir the mixture thoroughly for at least 30 seconds to ensure the water cools uniformly.
- Stabilize Temperature: Allow the ice-water mixture to sit for approximately 3-5 minutes. This time ensures the water reaches its stable freezing point.
- Submerge the Thermometer: Insert the stem of your analog thermometer into the ice-water mixture. For dial thermometers, make sure the “sensory dimple” (a small indentation on the stem that indicates the sensing area) is fully submerged, usually about two inches deep. Crucially, ensure the stem does not touch the sides or bottom of the container, as this can affect the reading.
- Read the Temperature: Wait for at least 30 seconds to 2 minutes (for dial thermometers) for the temperature reading to stabilize. A properly calibrated thermometer should read 32°F (0°C). If your thermometer reads more than 2°F (1°C) away from this point, it needs adjustment.
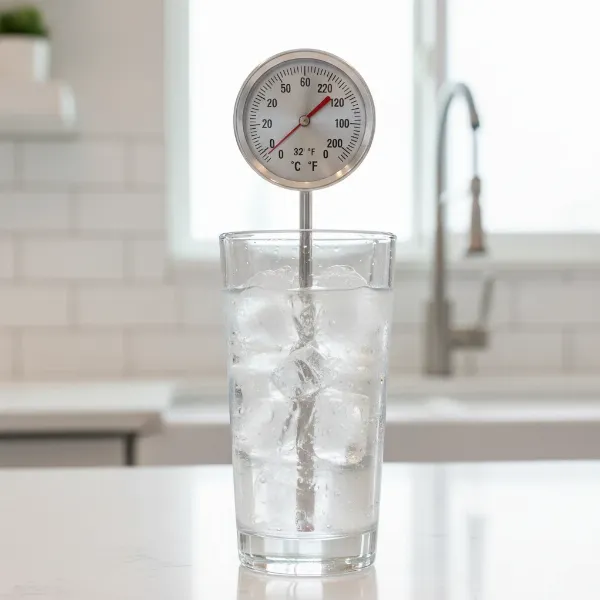 Analog thermometer being calibrated using the ice point method in a glass of crushed ice and water.
The Boiling Point Method
The boiling point method uses the boiling temperature of water, which is 212°F (100°C) at sea level, as a reference.
Follow these steps:
- Prepare Boiling Water: Bring a deep pot of water to a full, rolling boil.
- Calculate Local Boiling Point: Remember that the boiling point of water decreases with altitude. For every 500 feet above sea level, the boiling point drops approximately 1°F. Calculate your local boiling point for an accurate reference.
- Submerge the Thermometer: Carefully immerse the thermometer stem (including the sensory dimple for dial thermometers) into the boiling water for about 30 seconds. Again, ensure the stem does not touch the sides or bottom of the pot.
- Read the Temperature: Wait for the reading to stabilize, typically around one minute. A perfectly calibrated thermometer should match your local boiling point. If the reading deviates by more than 2°F (1°C), adjustment is necessary. This method is often preferred for confirming accuracy at high temperatures.
Step-by-Step Guide to Adjusting Your Analog Thermometer
If your analog thermometer doesn’t read accurately during either the ice point or boiling point test, you can often adjust it. This process is typically applicable to bimetallic (dial) thermometers, which feature a calibration nut.
Here’s how to adjust it:
- Identify the Calibration Nut: For most analog dial thermometers, you’ll find a small hexagonal nut located directly beneath the dial face, where the stem connects to the head.
- Keep Immerse: While the thermometer’s stem is still immersed in the ice-water or boiling water mixture (and not touching the container), gently hold the head of the thermometer steady.
- Adjust the Dial: Using a small wrench or a pair of pliers, carefully grasp the calibration nut. Slowly turn the nut. As you turn it, you will see the needle on the thermometer dial begin to move.
- Set to Correct Temperature: Continue turning the nut until the thermometer’s needle points precisely to 32°F (0°C) for the ice point method, or your calculated local boiling point for the boiling point method.
- Re-test: Once adjusted, remove the thermometer, let it cool or warm to room temperature, and then re-test it using the same method to confirm its accuracy.
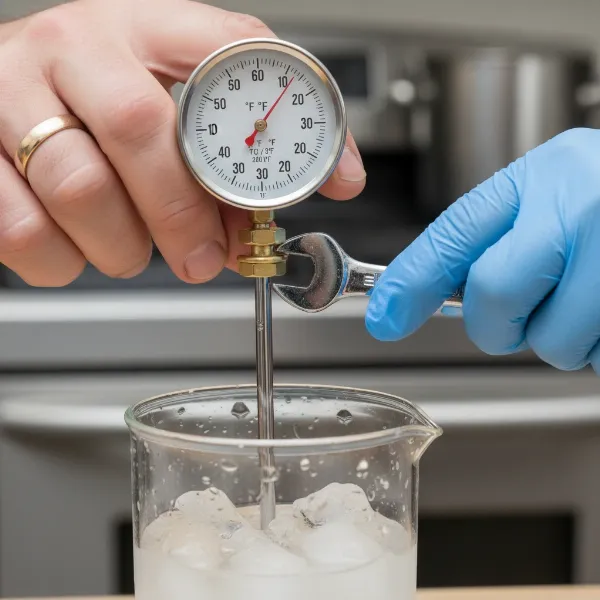 Hand using a wrench to adjust the calibration nut on an analog meat thermometer while it's in a liquid.
A Note on Digital Thermometers: Most digital thermometers cannot be manually calibrated by the user. If a digital thermometer is found to be inaccurate, it may have a reset button, require a battery replacement, or need to be returned to the manufacturer for service. Sometimes, knowing the offset (e.g., it always reads 3°F too high) allows you to mentally adjust, but this is less ideal for critical food safety.
Beyond Calibration: Maximizing Your Analog Thermometer’s Life and Accuracy
Maintaining your analog thermometer goes beyond just calibration. Proper use and care are essential to ensure its longevity and consistent accuracy.
- Proper Insertion: Always insert the thermometer stem fully into the thickest part of the food, avoiding bones, fat, or gristle, as these can give inaccurate readings. For dial thermometers, ensure the sensory dimple is completely submerged.
- Cleaning: After each use, clean the thermometer stem thoroughly with hot, soapy water. This prevents cross-contamination and removes any food particles that could interfere with future readings. Avoid immersing the entire dial head in water unless specifically designed to be waterproof.
- Storage: Store your thermometer in a clean, dry place where it won’t be dropped or suffer extreme temperature fluctuations. Many come with a protective sheath, which is ideal for storage.
- Know When to Replace: Even with the best care, thermometers can wear out or become permanently inaccurate. If your analog thermometer consistently fails to calibrate or shows erratic readings, it’s time to replace it to protect your food safety and cooking quality.
Achieving Culinary Perfection with a Calibrated Meat Thermometer
Using a properly calibrated meat thermometer is the secret weapon of any confident cook. It eliminates the guesswork, allowing you to consistently prepare dishes to perfection, whether you’re roasting a whole chicken, grilling a delicate fish fillet, or smoking a brisket. Knowing the precise internal temperature of your food gives you control, ensuring juiciness, flavor, and, most importantly, safety.
From tender beef to succulent pork and perfectly cooked poultry, each type of meat has an ideal internal temperature for both safety and optimal texture. With a calibrated thermometer, you can confidently hit those targets every time, transforming your meals from good to gourmet.
Conclusion
Calibrating your analog thermometer is a simple yet vital step in becoming a more confident and safe cook. By regularly performing the ice point or boiling point tests and making minor adjustments, you ensure that your thermometer is a reliable tool, helping you prevent foodborne illnesses and consistently achieve delicious, perfectly cooked meals. Don’t let an inaccurate reading compromise your culinary efforts or your family’s health. Take a few minutes to check your thermometer today, and elevate your cooking to a new level of precision. What culinary masterpiece will you tackle next with your perfectly calibrated thermometer?
Frequently Asked Questions
How often should I calibrate my analog thermometer?
For optimal food safety and consistent results, analog thermometers, especially bimetallic dial types, should be checked regularly, ideally before each use in a professional setting or monthly for home cooks. Calibration is also essential when the thermometer is new, dropped, or experiences extreme temperature changes.
Can all analog thermometers be calibrated?
Most bimetallic (dial) analog thermometers can be calibrated by turning a small nut located under the dial. However, some simpler, inexpensive models may not have this adjustment feature. If your thermometer doesn’t have a calibration nut, and it reads inaccurately, it may need to be replaced.
What is the “sensory dimple” on a thermometer?
The “sensory dimple” is a small indentation on the stem of a dial-type analog thermometer. This dimple indicates the area where the temperature is actually being measured. For an accurate reading, this part of the stem must be fully submerged in the food or calibration mixture.
Why is the ice bath method often preferred for calibration?
The ice bath method is preferred because the freezing point of water (32°F or 0°C) is a very stable and easily reproducible temperature. Unlike the boiling point, which can vary with altitude and atmospheric pressure, the freezing point is constant, making it a reliable reference for calibration.
What if my thermometer is more than 2°F off and I can’t adjust it?
If your analog thermometer is consistently more than 2°F (1°C) outside the accurate range and you cannot adjust it (e.g., no calibration nut, or adjustment doesn’t work), it is best to replace the thermometer. An inaccurate thermometer can compromise food safety and quality, so investing in a new, reliable one is recommended.