Achieving perfectly cooked meat, whether a juicy steak, a tender roast, or succulent poultry, hinges on one critical factor: accurate temperature. A reliable meat thermometer is the unsung hero of countless culinary triumphs, ensuring your dishes are not only delicious but also safe to eat. However, even the most advanced thermometers can lose their precision over time due to everyday use, accidental drops, or significant temperature shifts. When this happens, your culinary results can suffer, and food safety could be compromised. Fortunately, there’s a simple, effective, and readily available method to restore your thermometer’s accuracy: the ice water bath calibration. This guide will walk you through the process, empowering you to maintain peak performance for your essential kitchen tool.
 Digital meat thermometer inserted into a perfectly cooked medium-rare steak on a wooden cutting board.
The Crucial Role of a Calibrated Meat Thermometer
In the world of cooking, precision is paramount. A meat thermometer serves as your internal compass, guiding you to the exact doneness you desire, from rare to well-done. Beyond personal preference, accurate temperature readings are a cornerstone of food safety, preventing the risks associated with undercooked meats. Pathogens can thrive in foods that haven’t reached their minimum internal temperatures, making a correctly calibrated thermometer an indispensable safeguard in your kitchen.
Thermometers can drift from their true readings due to various factors. A sudden drop onto a hard surface, repeated exposure to extreme temperatures, or simply the natural wear and tear of frequent use can all impact accuracy. This is why regular calibration isn’t just a suggestion; it’s a vital practice. It ensures that when your thermometer reads 165°F for chicken, you can trust that your chicken is, in fact, at a safe and delicious 165°F. Whether you’re using an instant-read digital thermometer or a classic dial-style model, the principle of regular calibration holds true.
Understanding the Ice Water Method: Why It Works
The ice water method, often referred to as the “ice point method,” is one of the most fundamental and reliable ways to calibrate a thermometer. Its scientific basis is elegantly simple: pure water freezes at a consistent temperature of 32°F (0°C) at standard atmospheric pressure. A properly prepared mixture of ice and water will naturally stabilize at this precise temperature, providing an unvarying benchmark against which your thermometer can be tested.
This method is preferred for its accessibility and inherent accuracy. Unlike the boiling water method, which can be influenced by changes in altitude (where water boils at a lower temperature), the freezing point of water remains constant. By submerging your thermometer in this standardized ice bath, you create a perfect control environment to verify if your device is reading temperatures correctly. If your thermometer deviates from 32°F, it indicates a need for adjustment, allowing you to fine-tune its accuracy and ensure it’s ready for your next culinary adventure.
Step-by-Step Guide: Calibrating Your Meat Thermometer with Ice Water
Calibrating your meat thermometer using the ice water method is a straightforward process that takes only a few minutes. Gather your materials, follow these steps carefully, and you’ll restore your thermometer’s precision in no time.
Materials Needed:
- Tall Glass: A glass or container large enough to immerse your thermometer’s probe at least two inches without touching the bottom.
- Crushed Ice: Finely crushed ice is ideal as it packs more densely, creating a more consistent temperature bath. If crushed ice isn’t available, cubed ice will also work, but ensure it fills the glass adequately.
- Cold Tap Water: Using cold water initially helps prevent the ice from melting too quickly.
- Meat Thermometer: The thermometer you wish to calibrate.
- (Optional) Small Wrench or Pliers: For adjusting analog dial thermometers that have a calibration nut.
|
Our Picks for the Best Meat thermometer in 2026
As an Amazon Associate I earn from qualifying purchases.
|
||
| Num | Product | Action |
|---|---|---|
| 1 | Alpha Grillers Meat Thermometer Digital - Instant Read Food Thermometer for Cooking and Grilling Gifts for Men Valentines Day Gifts for Him Her Mom Dad |

|
| 2 | Professional Meat Thermometer - Instant Read Food Thermometer with Waterproof Design, Backlight, Hold/Min/Max Function - Cooking Thermometer for Grilling, BBQ, Kitchen Use |
|
| 3 | Meat Thermometer Digital - Instant Read Food Thermometer for Cooking Grilling, Candy, Air Fryer, Griddle Probe Kitchen Gadgets Essentials BBQ Accessories, Valentines Day Gifts for Him Her, Red |
|
| 4 | 0.5 Sec Instant Read Meat Thermometer Digital with ±0.5℉ Precision, Food Thermometer for Cooking Kitchen Gadgets, Oven Grill Candy BBQ Essentials Accessories, Gifts for Him Dad Men Birthday, Red |
|
| 5 | Meat Thermometer Digital, Instant Read Meat ThermometerI for Grill and Cooking, Waterproof Food Thermometer for Kitchen and Outside, BBQ, Turkey, Candy, Liquids, Beef |
|
| 6 | ThermoPro TP03B Digital Meat Thermometer for Cooking, Instant Read Thermometer with Backlight, Kitchen Food Thermometer for Grill Smoker BBQ Oil Deep Fry Candy Bread Coffee with Pop-up Meat Probe |
|
| 7 | TempPro TP829 1000ft Wireless Meat Thermometer Digital for Grilling and Smoking, 4 Meat Probes Grill Thermometer for Outside Grill, BBQ Thermometer for Cooking Food Temperature (Previously ThermoPro) |
|
| 8 | Ultrean Digital Meat Thermometer for Cooking,Ultra-Fast Instant Read Food Thermometer with Backlight,Foldable Probe,Waterproof Kitchen Thermometer for BBQ,Grill,Fry,Oven,Candy Making |
|
| 9 | ThermoPro TP19H Digital Meat Thermometer for Cooking with Ambidextrous Backlit and Motion Sensing Kitchen Cooking Food Thermometer for BBQ Grill Smoker Oil Fry Candy Instant Read Thermometer |
|
| 10 | Meat Thermometer Digital with 1 Second Instant Read, Large LED Display, Food Thermometer |
|
The Calibration Process:
- Prepare the Ice Bath:
- Fill your tall glass completely with crushed ice.
- Slowly add cold tap water until the water level reaches just below the top of the ice, leaving about half an inch of ice uncovered. This ensures a rich ice-to-water ratio.
- Stir the mixture thoroughly with a spoon for about 30 seconds to distribute the cold evenly. Let the ice bath sit undisturbed for one to two minutes to allow the temperature to stabilize. You want a slushy consistency, not just ice floating in water.
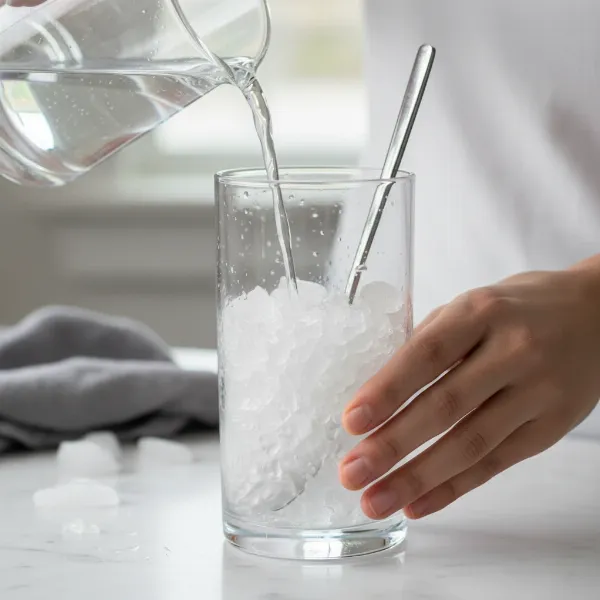 Hands preparing an ice water bath with crushed ice and water in a tall glass for thermometer calibration.
-
Insert the Thermometer:
- Carefully insert the stem or probe of your meat thermometer into the center of the ice bath.
- Ensure the probe is immersed at least two inches into the mixture.
- Crucially, make sure the tip of the probe does not touch the sides or the bottom of the glass. Contact with the glass could lead to an inaccurate reading as the glass may not be at precisely 32°F.
-
Allow to Stabilize:
- Hold the thermometer steady in the ice bath.
- For most digital thermometers, the reading should stabilize within 30 seconds. For analog (dial) thermometers, allow 1 to 2 minutes for the needle to settle completely. Patience here ensures an accurate assessment.
-
Read the Temperature:
- Once the reading has stabilized, observe the temperature displayed on your thermometer.
- A perfectly calibrated thermometer should read exactly 32°F (0°C).
-
Adjust if Necessary:
- For Analog (Dial) Thermometers: If your thermometer does not read 32°F, locate the hexagonal calibration nut usually found just under the dial. Using a small wrench or pliers, carefully turn this nut until the needle points precisely to 32°F while still immersed in the ice bath.
- For Digital Thermometers: Most digital thermometers either self-calibrate or have a dedicated calibration button (often labeled “CAL” or similar). Consult your thermometer’s instruction manual for specific calibration procedures. Some advanced digital models may not have a user-adjustable calibration feature; if they are off, you may need to factor the variance into your readings or consider replacement.
-
Re-Test (Optional but Recommended):
- After making an adjustment, remove the thermometer from the ice bath, wait a few minutes, and then repeat the entire process from step 1 to confirm the calibration. This double-check ensures your thermometer is now performing optimally.
Troubleshooting Common Calibration Challenges
Even with a simple method like ice water calibration, you might encounter a few hiccups. Understanding these common challenges and how to address them can save you time and frustration.
Challenge 1: Thermometer Not Reading 32°F After Adjustment
If, after attempting to adjust your thermometer (especially analog models), it still refuses to land precisely on 32°F, it might indicate a mechanical issue. First, ensure your ice bath is properly prepared: plenty of ice, stirred well, and allowed to stabilize. If the issue persists, the thermometer might be faulty or at the end of its lifespan. For digital thermometers without a calibration button, a consistent inaccurate reading often means it’s time for a replacement.
Challenge 2: Ice Melting Too Quickly
A rapidly melting ice bath means your temperature reference isn’t stable. This can happen if you use warm water initially or not enough ice. Always start with cold tap water and ensure your glass is packed tightly with crushed ice, leaving only a small amount of ice uncovered by water. If necessary, drain some water and add more ice to maintain the slushy, icy consistency crucial for a stable 32°F environment.
Challenge 3: Ensuring Proper Immersion
An often-overlooked detail is allowing the thermometer probe to touch the sides or bottom of the glass. This can transfer ambient temperature from the glass, leading to an incorrect reading. Always hold the thermometer suspended in the center of the ice bath, ensuring the sensing tip is fully immersed (at least two inches) but free from contact with the container itself. If your thermometer has an immersion mark, use that as a guide.
Challenge 4: When to Replace a Thermometer
Not all thermometers can be calibrated. If your thermometer consistently reads significantly off and is not adjustable, or if it’s an older model showing signs of wear and tear, it might be more cost-effective and safer to invest in a new, high-quality meat thermometer. While troubleshooting is good, there comes a point where reliability trumps repair.
Maintaining Your Meat Thermometer for Lasting Accuracy
Calibrating your meat thermometer is a key step, but proper maintenance ensures its accuracy and longevity for years to come. A well-cared-for thermometer is a reliable partner in the kitchen.
- Regular Cleaning: Always clean your thermometer probe thoroughly after each use with hot, soapy water or an antibacterial wipe. This prevents cross-contamination and removes food residues that could affect future readings or damage the probe. Ensure the unit itself (especially the digital display) is not submerged unless it’s explicitly waterproof.
- Proper Storage: Store your meat thermometer in a safe place where it won’t be easily dropped, jostled, or subjected to extreme temperatures. Many thermometers come with protective sheaths or cases; use them! Keeping it in a drawer where it can be knocked around by other utensils increases the risk of damage and loss of calibration.
- Routine Checks: Make calibration a routine. A good rule of thumb is to calibrate your thermometer at least once a month, or more frequently if you use it often, drop it, or suspect it might be off. Some professional kitchens calibrate their thermometers daily before service. This vigilance ensures you’re always working with precise equipment.
By integrating these simple maintenance habits, you can extend the life of your meat thermometer and continue to achieve perfect cooking results every time.
Conclusion
An accurate meat thermometer is an indispensable tool for any home cook, essential for both culinary excellence and crucial food safety. The ice water calibration method offers a simple, reliable, and accessible way to ensure your thermometer is always performing at its peak. By understanding why calibration matters, meticulously following the step-by-step process, and adhering to good maintenance practices, you empower yourself to consistently prepare perfectly cooked, safe, and delicious meals. Don’t let an inaccurate reading compromise your culinary efforts or your family’s well-being. Make ice water calibration a regular part of your kitchen routine, and cook with confidence every single time. What delicious dish will you perfectly prepare with your newly calibrated thermometer?
Frequently Asked Questions
How often should I calibrate my meat thermometer?
It is recommended to calibrate your meat thermometer at least once a month. You should also re-calibrate it anytime you suspect it might be inaccurate, such as after dropping it, or before cooking critical dishes where precise temperature is crucial for food safety and desired doneness.
What if my digital thermometer doesn’t have a calibration button?
If your digital thermometer lacks a user-adjustable calibration button, it likely self-calibrates or cannot be manually adjusted. In this case, if it consistently reads inaccurately in the ice bath test, you should note the deviation and account for it when cooking, or consider replacing the thermometer for optimal precision.
Can I use cubed ice instead of crushed ice?
While finely crushed ice is ideal for creating the most stable and consistent ice bath, cubed ice can certainly be used. If using cubed ice, ensure you pack the glass tightly and stir thoroughly to eliminate air pockets and create a dense, slushy mixture that will provide an accurate 32°F (0°C) reference point.
Why is 32°F (0°C) the correct reading for ice water?
32°F (0°C) is the precise freezing point of pure water at standard atmospheric pressure. This makes a properly prepared ice and water mixture a universally consistent and reliable benchmark. By testing your thermometer against this fixed point, you can accurately determine if it’s reading temperatures correctly.